Leaf curl disease can be a major concern for various crops, affecting their growth, yield and overall productivity. It is caused by group of viruses known as begomoviruses, transmitted by whiteflies. This article will provide you with a concise overview of leaf curl disease and practical management strategies to protect your crops. By understanding the disease’s symptoms, transmission and implementing preventive measures like crop rotation, sanitation practices and insect control, you can effectively manage and reduce the impact of leaf curl virus on your yields.
How is it caused?
- The primary mode of transmission for leaf curl virus is through whiteflies (Bemisia tabaci). These tiny insects feed on infected plant sap, acquiring the virus and then transmit it to healthy plants as they move and feed on them.
- The virus can be introduced into a region through infected plant materials i.e., seedlings or saplings.
- Leaf curl disease tends to be more prevalent in regions with warm and tropical climates (25 – 30°C), as these conditions favor the growth and reproduction of both the virus and the whitefly vector.
- Some weeds and alternative plant hosts serve as reservoirs for the viral pathogen.
- Lack of crop rotation can increase the buildup and spread of the virus within a field or across neighboring fields.
Host crops
Leaf curl viruses affect a wide range of host crops including tomato, chilli, brinjal, cotton, tobacco, okra, papaya, and cucurbits.
Leaf Curl Virus Symptoms:
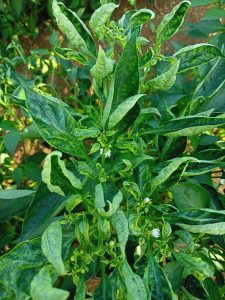
- The affected leaves exhibit an upward or downward curling along their edges, giving them a cupped or crinkled appearance.
- These leaves often become thick and leathery compared to healthy leaves. They may also appear stiff and brittle.
- They may show yellowing or chlorosis, particularly along the veins.
- Veins on infected leaves may appear thicker and enlarged.
- Infected plants may not produce flowers and fruits, or they produce fewer flowers and fruits that are small, misshapen, or of poor quality.
- Plants affected by virus show stunted growth, characterized by shortened internodes and significantly reduced leaf size.
Preventive Measures
- Use disease-free seeds or seedlings like Polyana polyhouse tomato, Namdhari tomato seeds 592, Venus plus bhendi, Sarpan F1 Hybrid chilli seeds, Sarpan chilli seeds F1 291, Mona 002 bhendi, JK desi tomato seeds.
- Practice crop rotation by avoiding planting susceptible crops in the same area consecutively. For example, rotating tomato/chilli crops with non-host crops like legumes, onion and brassicas.
- Early planting can help establish crops before the peak disease period.
- Remove and destroy any plants showing symptoms of leaf curl disease.
- Remove weeds in and around the field.
- Grow barrier crops around the field to deter whiteflies. For example, maize or sorghum in chilli field, sesbania in tobacco field.
- Install 6 – 8 yellow sticky traps for per acre field to control the whitefly population.
Management of Leaf Curl Virus in Crops
There is no specific chemical control available to cure or control viral infections in plants. However, following the above-mentioned preventive measures, maintaining plant health and controlling vectors can significantly help to control leaf curl disease in plants.
Prophylactic use of an organic viricide and micronutrient at early stages of crop growth may help to boost the plant’s natural defense mechanisms and enhance the resistance towards diseases.
| Product name | Technical content | Dosage |
| Vanproz V-Bind or | Plant Extracts | 2 – 3 ml/lit water |
| VC-100 | Organic compounds | 5 gm/lit water |
| Multiplex Magnum Mn or | Manganese 12% | 0.5 gm/lit water |
| General liquid Micronutrient | Multi Micronutrients | 2.5 ml/lit water |
Management of Vector, Whitefly:
Control the population of whiteflies by following a combination of mechanical+ biological + chemical management to help reduce the spread of the virus.
| Product name | Technical content | Dosage |
| Mechanical Management | ||
| T.Stanes Goal (Whitefly trap and lure) | Yellow sticky trap | 12 traps per acre (moderate infestation) or
15 traps per acre (heavy infestation) |
| Biological Management | ||
| Greenpeace Neemol Bio Neem Oil Insecticide | Neem Oil extracts (Azardiractin) | 1 – 2 ml/lit water |
| Nanobee Agrokill Insecticide | Nano Colloidal Micelles 100% (Fatty Acid based Plant Extracts) | 3 ml/lit water |
| Anand Dr Bacto’s Brave | Beauveria bassiana | 2.5 ml/lit water |
| Chemical Management | ||
| Osheen Insecticide | Dinotefuran 20% SG | 0.2 gm/lit water |
| Tatamida SL Insecticide | Imidacloprid 17.8% SL | 1 ml/lit water |
| Oberon Insecticide | Spiromesifen 22.9% SC | 0.3 ml/lit water |
| Anant Insecticide | Thiamethoxam 25% WG | 0.3 gm/lit water |
| Benevia Insecticide | Cyantraniliprole 10.26% OD | 1.5 ml/lit water |
| Dhanpreet Insecticide | Acetamiprid 20% SP | 0.2 gm/lit water |
| Police Insecticide | Fipronil 40% + Imidacloprid 40% WG | 0.3 gm/lit water |
| Takaf Insecticide | Diafenthiuron 47% + Bifenthrin 9.4% SC | 1.25 ml/lit water |
(NOTE: Follow product’s label to know the right time of application)
Leaf Curl Confusions
Leaf curl symptoms can indeed be confused with viral, fungal diseases, and physiological disorders.
- Fungal leaf curl diseases are caused by various pathogenic fungi, such as Taphrina spp., that infect plants and cause abnormal leaf curling symptoms. Presence of fungal structures, spores or visible fungal growth along with lesions or spots indicates fungal disease.
- Physiological leaf curl disorders, also known as non-infectious leaf curl, are not caused by pathogens but rather by environmental or physiological factors. These disorders often result from adverse growing conditions, nutrient imbalances, extreme temperatures or other stress factors.
Read More: Effective Management of Leaf Curl Virus in Chilli Crops