Home Blog Page 29

Flower Dropping And Decreased Fruit Set In Papaya: Management Strategies

0
Flower Dropping And Decreased Fruit Set In Papaya: Management Strategies

Papaya (Carica papaya) is a tropical fruit that is commercially significant due to its exceptional nutritional and medicinal value. One of the most interesting aspects of papaya trees is their unique sexual characteristics and the nature of their flowering. Unlike most other fruit trees, papaya trees are able to change their sex and produce both male and female flowers at different stages of their development. Papaya plants/trees may be categorized to male, female or hermaphrodite trees based on type of flowers they produce. Depending on the tree’s type, the flowers and fruit (if found) vary in appearance, function and size. Typically, a papaya plant’s gender may change depending on the temperature during the developmental stages.  

Papaya Trees – Male type 

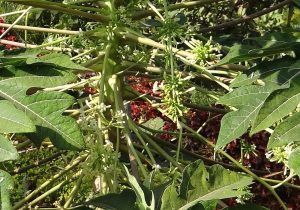
The flowers of male papaya trees are small which grow in clusters on long stalks (peduncle) and have a thin, tube-like structure. Unlike female flowers, which only contain a pistil, male flowers have both male and female reproductive organs, with stamens producing pollen and pistils not functioning for fruit production. 

Under normal conditions, male papaya trees cannot produce fruit. However, in certain environmental conditions, such as high temperatures in the summer, the tree may undergo a temporary gender change, becoming a hermaphrodite. In this case, the previously non-functional pistil can become active, allowing the tree to produce fruit after pollination.

Male inflorescence
Male inflorescence
Papaya male flower clusters on long stalks

Papaya Trees – Female type

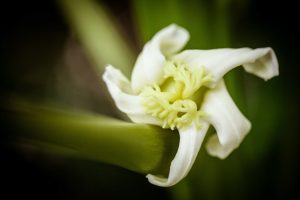
The flowers of female papaya trees grow singly or in small clusters and are typically larger than male flowers. They develop on shorter stalks and have a distinctive bulbous base that contains the ovary, which develops into the fruit when fertilized. The petals (5 in number) of female papaya flowers are broad and thick. Even though the male reproductive organ (stamen) is absent, the pistil is capable of producing fruit through pollination. Pollination is usually done by bees or other insects.  

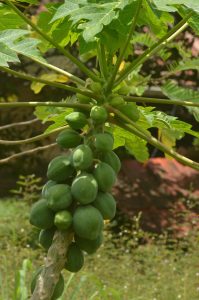
The fruit produced by pollinated female flowers is typically a green-skinned, melon-like fruit that ranges in size from 6 to 15 inches and contains yellow or orange flesh and black seeds. Unpollinated female papaya tree may produce seedless papaya fruit.

Female Papaya Flower

Papaya Trees –Hermaphrodite type

Hermaphrodite Papaya Tree

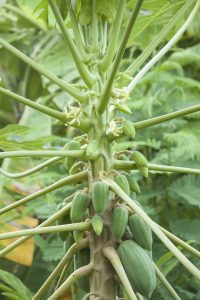
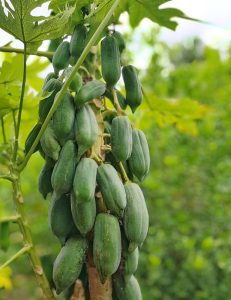
Hermaphrodite papaya trees are those that have both male and female reproductive organs in their flowers, making them capable of self-pollination and fruit production. Fruits produced from hermaphrodite papaya plants are generally medium to large in size, with an oval or elongated shape. They have a smooth, thin and slightly waxy skin that ranges in color from green to yellow orange when ripe and have a minimal number of small, black seeds. 

During hot weather, hermaphrodite papaya trees may act as male trees, while under certain timing or training conditions, they may behave as female trees. this type of trees is preferred by commercial growers because they are more reliable and produce more fruit than female trees. However, they may require hand-pollination in some cases to ensure optimal fruit production.

Fruits in Female Papaya Tree
Fruits in Hermaphrodite Tree

Causes of Flower dropping in Papaya trees: 

  1. Temperature and Relative Humidity (RH):

For optimal pollination and fertilization of papaya fruits, the temperature should ideally be between 20 to 33°C, while the RH should be between 70 to 85 percent. Any temperature or humidity levels either below or above this range can negatively impact the pollination process and result in flower dropping before the fruit is formed. In cases where the temperature is too low, chemical growth regulators can be used to compensate, but this may result in seedless or low-quality fruit.  

  1. Cultural Factors:

Cultural factors, such as inadequate or excessive nitrogen (N) fertility levels, can lead to flower dropping in papaya trees. Both low and high doses of nitrogen can cause this issue. Toxicity can have a direct effect on flower abortion. While even medium levels of ammonical nitrogen can affect flower and fruit settings. This can also trigger viral infections, leading to flower dropping.  

  1. Water management:

Papaya trees are sensitive to both flooding and drought. Insufficient and excess moisture can have adverse effects on flower development, pollination, fertilization and fruit setting in papaya trees. Uneven water supply to the papaya plants can induce stress, resulting in irregular flower production and fruit setting. 

  1. Light Exposure:

Reduced or increased duration of light exposure can have negative consequences, potentially affecting flower development, pollination, fertilization and fruit setting. 

  1. Wind:

Excessive wind can naturally result in physical damage to flowers, causing them to fall off and can also cause pollen to be swept away, potentially leading to inadequate pollination and fertilization. 

  1. Pests:

The damage caused by insects, especially those that feed on flowers or fruits, can negatively impact the health of papaya flowers. Chewing insects may also contribute to flower damage. Fruit flies are especially problematic and can cause premature flower droppings. 

  1. Diseases:

Fungal and bacterial diseases can affect flower development, leading to flower dropping. Viral infections can also cause flower and fruit drops, as the virus can affect the plant’s ability to develop and mature the flowers and fruits.   

  • Fungal infections: Powdery mildew, Downy mildew, Black spot.  
  • Bacterial infections: Bacterial spot, Speck disease. 
  • Viral infections: Papaya Ring spot infections, Leaf Curl viral infections etc. 
  1. Nutrient deficiency:

When the soil has poor water and nutrient holding capacities, nutrient deficiencies can occur, especially for micronutrients such as boron and calcium. This is particularly common in sandy and light soils. 

Control Measures to prevent Papaya Flower Drop: 

  • The temperature and relative humidity are environmental factors that are often beyond the grower’s control. Similarly, the light exposure the trees receive cannot be controlled. 
  • In some cases, the only option for the grower is to wait for favorable weather conditions, while in extreme conditions, regulating irrigation practices can help to control the microclimatic conditions.  
  • To protect papaya plants from high winds, physical wind barriers can be erected along the borders, allowing necessary airflow while preventing damage from excessive wind. 
  • By monitoring disease and pest management, flower drops can be avoided, and maximum yield can be achieved in papaya cultivation.  
  • Ensure the papaya plants receive consistent and adequate watering, particularly during the flowering stage, to avoid water stress. 
  • Provide balanced fertilization and micronutrients to the papaya plants, as nutrient deficiencies or toxicity can cause flower drop. 
  • Ensure adequate pollination by introducing pollinators like honeybees, or hand-pollinate using a soft brush, as poor pollination can cause flower drops. 
Management  Products 
Micronutrients 
  • Spray Allbor (20% Boron) micronutrient at 1 gm/lit during flowering and fruit setting stage. 
  • Spray Multiplex Magnum Mn (Manganese 12%) at 0.5 gm/lit of water. It helps to resist viral multiplication in plants. 

(Use Shamrock Overseas Sluuurp wetting and spreading agent at 0.5 – 1 ml/lit of water) 

Pests 
Diseases  Fungal Diseases: 

Bacterial Disease: 

Viral Diseases: 

  • Spray Geolife no virus at 3 – 5 ml/lit water or Spray VC 100 at 5 gm/lit of water. 
  • Control vectors (sucking pests) spreading the diseases. 


The Battle Against Rice Caseworm: Symptoms And Solutions 

0
The Battle Against Rice Caseworm: Symptoms And Solutions 

The rice caseworm is a pest that commonly affects rice crops and is mostly found in rice-growing regions worldwide. The larvae of the rice caseworm feed on the leaves of rice plants causing defoliation, yield loss and even crop failure which can lead to significant damage to the rice crops. Paddy at seedling and vegetative stages are the most preferred host of rice caseworms. It is commonly found in irrigated and rainfed wetland rice fields with poor drainage areas. The larvae can be identified by its translucent green body, orange head with filamentous gills on the side of the body. Transplanting young seedlings favors the development of rice caseworms.  

Type of Infestation

Larvae feed on the chlorophyll content of the leaves leading to defoliation, stunted growth and death of the affected plant. 

Scientific Name: Nymphula depunctalis  

Most Affected States Due to Rice caseworm

The Paddy case worm is found throughout India, but it is most prevalent in the rice-growing regions of West Bengal, Assam, and Bihar.  

Symptoms of Rice caseworm

  • The larvae consume the green tissue of the leaves, causing them to turn whitish and papery. 
  • By cutting the apical part of leaves, caterpillars create tubular cases around themselves that can float on water. 
  • Ladder-like leaf tissues can be seen on the infested leaves. 
  • In case of severe infestation, plant growth is completely reduced. 

Control Measures

Rice Caseworms can be controlled by following the below mentioned cultural, Mechanical, Biological and Chemical methods. 

Rice Caseworm Cultural Measures

Cultural control methods for managing Paddy case worm infestations include the following: 

  • Early planting can help rice crops avoid the peak activity period of caseworm moths. 
  • Draining rice fields for 5-7 days can effectively kill caseworm larvae. 
  • Provide rice fields with wider hill spacing, typically 30 x 20 cm to experience less damage from caseworm.  
  • Applying nitrogen fertilizer at optimal dosages and using split applications can reduce the abundance of rice caseworms. 
  • Use a rope to dislodge the caseworm, causing them to fall on the ground and subsequently drain the water, gather the cases and destroy them.

Mechanical Measures

  • Mix 400 ml of kerosene with 10 kg of sand and apply the mixture to the stagnant water. Then use coir rope for dislodging the caseworms in water mixed with kerosene.  

Rice Caseworm Biological Measures

  • Release natural predators such as larval parasitoids, Elasmus sp., Apanteles sp., Bracon sp., and pupal parasitoids, Pediobius sp., Apsilops sp., Eupteromalus parnarae to control the rice caseworms population. 
  • Also encourage biocontrol agents like hydrophilid and dytiscid water beetles to feed on the larvae of caseworms and spiders, dragonflies, birds to feed on the adult caseworms. 

Rice Caseworm Chemical Measures

  • Coromandel phendal is a broad-spectrum insecticide, which has a strong pungent odour that prevents adult caseworm moths from laying eggs. It contains a penthoate 50% EC and when used at the rate of 2 ml per liter of water can effectively control rice caseworms. 
  • Ekalux Insecticide is another broad-spectrum insecticide that can be effective in controlling rice case worm infestations. It contains Quinalphos 25% EC. The recommended dosage is 2 ml per liter of water. 

Explore Management Of Bacterial Leaf Blight In Rice/Paddy.

The Fight Against Paddy Hispa: Best Practices For Management  

0
The Fight Against Paddy Hispa: Best Practices For Management  

Rice hispa, also known as spiny beetle, is a serious pest of rice crops. Rice hispa is a well-known invasive pest which causes significant damage to rice crops resulting in reduced yield and economic losses to farmers. This article will provide an overview of rice hispa including its characteristics, symptoms and control measures. 

They are small bluish black beetles with a number of spines on the elytra. Female makes a minute slit towards the tip of tender lead blade and lay eggs singly, which hatch out into flat yellowish grubs and mine into leaves and produce blotches. They pupate in the leaf mines. The entire life cycle of rice hispa is completed within rice leaves. Rainy and cloudy weather conditions favor the growth and development of rice hispa. 

Type of Infestation

The paddy hispa larva tunnels into the leaf blade and consumes the green tissue between the veins, while adult beetles feed by scraping off the green matter of the tender leaves. This feeding behavior can cause significant damage to the rice plant, particularly during its early stages of growth. 

Scientific Name: Dicladispa armigera  

Most Affected States Due to Rice Hispa

Rice hispa is found in many parts of India. Some of the most affected states include Gujarat, Haryana, Orissa, Punjab, Andhra Pradesh and Assam.  

Symptoms of Rice Hispa

  • Adult beetles scrape the green matter of the leaf causing characteristic white parallel streaks.   
  • Leaves are left with only epidermis at the lower part as they scrape the green matter from the upper portion of leaf blade.  
  • The damaged leaves can wilt and fall off. 
  • Severe infestation makes rice fields look scorched. 

Rice Hispa Control Measures

A comprehensive strategy, encompassing cultural, physical, biological and chemical methods can be implemented to effectively manage paddy hispa. 

Rice Hispa Cultural Measures

  • Early planting is recommended to avoid infestation. 
  • Avoid applying excessive doses of nitrogenous fertilizers. 
  • Clipping the tips of the leaf blades prior to transplanting can remove paddy hispa eggs. 
  • Eliminating rice ratoons and volunteer rice during the crop-free season can impact the survival and multiplication of over-wintering populations of paddy hispa. 

Physical Measures

  • Hand picking and destroying the beetles is one of the effective ways to reduce the rice hispa population. 

Biological Measures

  • Introducing natural predators like Reduviid bug can help reduce the population of paddy hispa. 

Rice Hispa Chemical Measures

In cases where cultural, physical and biological control strategies are not sufficient to control Paddy Hispa, adoption of chemical method of control may be necessary. There are several insecticides available for controlling paddy hispa, including:   

Product Name  Technical Content  Dosage 
Actara Insecticide  Thiamethoxam 25 % WG  0.5 gm/lit of water 
Reeva 5 Insecticide  Lambda Cyhalothrin 5 % EC  2 ml/lit of water 
Mitlar – E   Emamectin Benzoate 1.9 % EC  1-1.5 ml/lit of water 
Citara Insecticide  Thiamethoxam 25 % WG  0.5gm/lit of water 
Police Insecticide  Fipronil 40% + Imidacloprid 40% WG  0.2-0.5 gm/lit of water 
Sanvex SP Insecticide  Cartap Hydrochloride 50 % SP  1.5-2.5 gm/lit of water 


CLICK HERE : Management Of Brown Spot In Rice/Paddy

Rice Swarming Caterpillar Infestation And Its Management 

0
Rice Swarming Caterpillar Infestation And Its Management 

The Rice Swarming Caterpillar is considered a destructive pest that infests rice crops, causing significant threat to rice production. Rice swarming caterpillars feed on rice leaves, stem and panicles, leading to yield losses ranging from 20% in moderate infestation to 70% in severe infestation. This pest is particularly concerning because it has the ability to reproduce quickly and can migrate over large distances, making it difficult to control.  

Rice swarming caterpillars are polyphagous in nature which attacks various other gramineous crops and weeds, but upland rice is the preferred host of this caterpillar. Heavy rainfall favors the outbreak of rice swarming caterpillars. The mature larvae can be identified by their green, grey or brown color body with dark dorsal and sub dorsal longitudinal stripes. They also have two rows of black color C-shaped spots on their backs. 

Type of Infestation

The Rice Swarming Caterpillar can cause both sporadic and epidemic outbreaks. Sporadic outbreaks occur when small populations of the pest appear in localized areas, while epidemic outbreaks occur when large populations of the pest spread rapidly over a wide geographic area. These outbreaks can cause significant damage to rice crops by feeding on rice leaves and stems and result in reduced yields.  

Scientific Name: Spodoptera mauritia 

Most Affected States Due to Rice Swarming Caterpillar

The Rice Swarming Caterpillar is known to affect several states in India, particularly northern and eastern regions of the country, where rice production is a significant agricultural activity. The affected states include Bihar, Uttar Pradesh, West Bengal, Jharkhand and Odisha.  

Symptoms of Rice Swarming Caterpillar

The Rice Swarming Caterpillar can cause several damaging symptoms or infestation signs, including: 

  • The caterpillars move in large numbers and cause damage to the paddy crop by cutting off leaf tips, margins and even entire plants at the base.  
  • The larvae feed on the leaves of the rice plants, making shot holes on the leaf blades. 
  • Skeletonization of leaves and dieback of stems. 
  • The damage is more severe on seedlings in nurseries and direct seeded crops, as well as during the early tillering stage in transplanted rice.  
  • Severely infested fields show cattle grazed appearance. 

Rice Swarming Caterpillar Control Measures

An integrated pest management technique which includes cultural, mechanical, biological and chemical methods is often necessary to effectively control rice swarming caterpillars. 

Cultural Measures

  • Crop rotation with non-host crops helps to reduce the population of rice swarming caterpillars. 
  • Deep summer ploughing of fields exposes larvae and pupa of rice swarming caterpillar, which are located in the soil to birds. 
  • Flooding the nurseries and paddy fields will also expose the larvae to birds. 
  • Provide bird perches to facilitate predation by birds. 
  • Avoid using excessive amount of nitrogenous fertilizers. 
  • Allowing ducks into the field can feed on the larvae of rice swarming caterpillar. 

Physical Measures

  • As the moths of swarming caterpillars are attracted towards light, set up a Solar Light Trap which helps to catch the flying insects. It is recommended to install 1 trap per acre for effective trapping. 

Rice Swarming Caterpillar Mechanical Measures

  • Hand picking and destroying the caterpillar is an effective way to control rice swarming caterpillar. 
  • In severe infestation cases, mix one litre of kerosene with 25 kg soil and broadcast in 1 hectare area.  
  • Tapas Yellow Sticky Trap can be used to trap adult moths. For effective trapping install 4 to 6 traps per acre. 

Biological Measures

  • Release natural predators such as an egg parasitoid Telenomus spp. and a larval parasitoid Apanteles spp. @40000 per acre for controlling rice swarming caterpillar. 
  • Greenpeace Neemol Bio Neem Oil Insecticide contains neem-based products azadirachtin which when used at the rate of 1-2ml per liter of water with 15days interval between each spray can effectively control swarming caterpillars in fields. 

Rice Swarming Caterpillar Chemical Measures

Chemical control methods involve the use of chemicals to manage the pest population. Insecticides that are commonly used to control the rice swarming caterpillars are mentioned in the table below, 

Product Name  Technical Content  Dosage 
Shamrock Gold CP Insecticide  Chlorpyriphos 20% EC  2.5 ml/lit of water 
Ekalux Insecticide  Quinalphos 25% EC  2 ml/lit of water 
Starclaim Insecticide  Emamectin benzoate 5% SG  0.5 gm/lit of water 
Plethora Insecticide  Novaluron 5.25% + Indoxacarb 4.5% SC  2 ml/lit of water 


Management Of Stemborer In Rice- Read More

Integrated Management Of Bacterial Blight Disease In Pomegranate

0
Integrated Management of Bacterial Blight Disease in Pomegranate

Bacterial blight is a serious disease that affects pomegranate cultivation in India, which is caused by the bacterium Xanthomonas axonopodis pv. punicae. The disease can cause significant damage to pomegranate trees, leading to reduced yield (in some cases up to 90%) and poor fruit quality. This, in turn, can affect the marketing value of the fruits and lead to significant economic losses for farmers. Thus, effective disease management strategies are crucial for controlling bacterial blight in pomegranate and maintaining productivity.  

What causes Bacterial Blight Disease in Pomegranate? 

Bacterial blight disease is more severe during fruiting stage. The bacterium can survive on infected plant debris, in soil, and in plant tissue, and can be transmitted through various means as given below. 

  • The bacterium can be spread from infected plant tissues to healthy tissues through splashing rain or irrigation water. 
  • Natural openings and wounds can act as a source for bacteria entry. 
  • Contaminated pruning tools, equipment and movement of workers may spread the disease over short distance. 
  • Infected planting material such as seedlings or cuttings can serve as a means of introducing the bacterium to new areas. 
  • Certain insects, such as thrips, blister beetles and whiteflies, can transmit the bacterium from infected to healthy plants while feeding. 
  • Environmental factors such as high humidity (> 50%) and temperature (25 – 35°C) along with intermittent rainfall and cloudy weather can create favorable conditions for the growth and spread of the bacterium.  

Bacterial Blight in Pomegranate Symptoms: 

  • Small, circular, water-soaked spots appear on the leaves, which later turn brown and necrotic. The spots may coalesce and form larger lesions. 
  • In severe cases, the infected leaves may turn yellow and fall off the plant, leading to defoliation 
  • Infected twigs turn brown or black and may wilt, causing dieback of the affected branches.  
  • Small, dark, sunken spots appear on the fruit surface, which can enlarge, cover the whole fruit surface and cause the fruit to crack or split open. 
  • The bacteria can cause the formation of gum-like exudates on the surface of infected tissues.  
  • Infected fruits may show internal discolouration due to rotting.  

Bacterial Blight in Pomegranate Preventive Measures: 

Cultural:

  • Use disease-free planting material. 
  • Use disinfectant pruning tools and equipment. 
  • Remove and destroy infected plant parts. 
  • Avoid overhead irrigation to reduce the spread of the disease. 
  • Ensure proper spacing between plants to promote good air circulation. 
  • After harvesting during Dec – Feb, prune the secondary and tertiary branches with infection. 
  • Apply the recommended dosage of fertilizers and incorporate well-decomposed farmyard manure and vermicompost along with it to enhance the resistance of plants against diseases. Application of manures and fertilizers during the rest period is also important. 

Biological:

  • Apply Biocontrol agents such as Pseudomonas fluorescens (10 ml/lit water) or Bacillus sp (250 ml + 10 kg FYM/Compost) and Trichoderma sp (1 – 2 kg + 100 kg FYM) as a prophylactic measure.  
  • Give a spray of 40% Tulsi extract followed by neem oil spray. 
  • The extracts of garlic bulb, meswak stem, and patchouli leaves at a concentration of 30% can be sprayed. 
  • Spray Geolife Geomycin Bio Bactericide at 0.5 – 1 gm/lit water or Terra BactoKill.at 3 ml/lit of water. 

Chemical (Prophylactic Measure):

  • To reduce the severity of the disease, apply a 1% Bordeaux mixture by spraying prior to pruning. 
  • Smear application of copper-based fungicides onto the surface of the plant parts susceptible to infection, such as the basal trunk, branches and twigs, before the onset of disease symptoms helps to control the disease. 
  • For this, following pruning, apply Streptocyclin or Streptomycin sulphate (0.2 gm/lit water) or Bactinash (0.5 gm/lit water) + Copper oxy chloride (2 gm/lit water) to the basal trunk of susceptible plants to decrease the occurrence of the disease.  

(Note: Always prepare Bordeaux mixture fresh and use on the same day) 

Management of Bacterial Blight in Pomegranate:  

In order to effectively manage bacterial blight in pomegranate, it is recommended to implement an integrated approach that combines preventive measures with other methods, as relying solely on chemical control is ineffective. 

The below mentioned chemicals can be used alone or in combinations.  

Product  Technical content  Dosage 
Blue Copper Fungicide or Blitox Fungicide  Copper Oxychloride 50% WP 


2 gm/lit water 
Dhanuka Kasu B Fungicide  Kasugamacyin 3% SL  2 – 3 ml/lit water 
Borogold Fungicide  Combination of Nano Silver Particles & Peroxy Acid  1.5 gm/lit water 
Crystocycline Bactericide Antibiotic  Streptomycin sulphate 90% + Tetracylin hydrocloride 10% SP  0.2 gm/lit water 
Kocide Fungicide  Copper Hydroxide 53.8% DF  2 gm/lit water 


(Note: After application of bactericide, spray General liquid micronutrient (2.5 ml/lit of water). It helps in effective management of the disease and also increases plant’s resistance against the disease. Also, check the product’s label to know the right time of application) 

Click Here to Discover More: Effective Strategies for Managing Bacterial Leaf Blight in Rice/Paddy

Preventing Yellow Vein Mosaic Virus Outbreaks In Bhendi: Strategies For Farmers

0
Preventing Yellow Vein Mosaic Virus Outbreaks in Bhendi: Strategies for Farmers

Bhendi (Abelmoschus esculentus), also known as okra or lady’s finger, is a popular vegetable that is widely grown and consumed in India. Like any other crop, bhendi is also susceptible to various diseases like fusarium wilt, powdery mildew, leaf spot and yellow vein mosaic virus. that can affect its growth and yield. Among these, yellow vein mosaic or vein-clearing is the most devasting viral disease in all bhendi growing regions of India. If the crop is affected by the virus at early stages, up to 80% of crop loss can be expected. 

Yellow Vein Mosaic in Bhendi 

The virus can infect plants at any growth stage. The infections are more prevalent during the summer months when the incidence and infestation of whiteflies are more severe.  

Causal organism: Bhendi Yellow Vein Mosaic Virus 

Vector: Whitefly (Bemisia tabaci) 

Symptoms of Yellow Vein Mosaic / Vein Clearing in Bhendi:

Yellowing of veins and veinlets of the leaves
  • Yellowing of veins and veinlets of the leaves. 
  • Later, interveinal regions of the leaves turn yellow or white. 
  • The leaves of the infected plant may show mosaic patterns of yellow and green. 
  • In case of severe infection, affected young leaves show complete chlorosis. 
  • The infected plants may show stunted growth and reduced size. 
  • The leaves may be smaller in size and may show distortion or curling. 
  • Affected plants may produce fewer flowers and fruits, and the fruits may be deformed, smaller in size, harder and yellow green in colour.

Preventive Measures: 

There are no known treatments for yellow vein mosaic virus, once a plant is infected. However, a combination of preventive measures and control strategies can be effective in managing the disease and minimize crop loss.  

  • Use Yellow Vein Mosaic Virus (YVMV) tolerant varieties/hybrids of bhendi like Rudraksh F1 Roshani Okra, Urja Agri – Bhindi Marina, Sarpan F1 hybrid bhindi, Indam 9821 bhendi, Pan 2127 hybrid bhendi. 
  • Avoid growing susceptible varieties during summer, since whitefly activity is high during the season.
  • Remove and destroy the disease affected plants from the field to avoid secondary spread.
  • Keep the field clean and free from weeds. 
  • Control the population of whiteflies and prevent the spread of the virus. 
  • Introduce natural predators of whiteflies, such as ladybugs and lacewings, to control their populations. 
  • Avoid excessive use of ammoniacal nitrogen fertilizers as it can increase the susceptibility of plants to viral infections. 
  • Plant leguminous crops like beans or lentils in rotation with bhendi to improve soil health and reduce the risk of disease transmission. 
  • Plant marigold, maize or sunflower as border crops to trap the vector, whitefly. 
  • Spray chilli and garlic extracts to repel whiteflies. 
  • Give foliar spray of Magnum Mn and Geo life No Virus to enhance the plant’s resistance to YVMV and reduce the incidence of the disease. 
  • Crop rotation with non-host crops. 
  • Installation of yellow sticky traps @ 6-8 per acre. 

Control Measures for Vector, Whitefly: 

Product Name  Technical Content  Dosage 
Mechanical Management 
Tapas Yellow Sticky Trap  Sticky trap  4 – 6 per acre 
Biological Management 
Greenpeace Neemol Bio Neem oil  Neem Oil extracts (Azardiractin)  1 – 2 ml/lit of water 
Anand Dr Bacto’s Brave  Beauveria bassiana    2.5 ml/lit of water 
Chemical Management 
Anant Insecticide  Thiamethoxam 25% WG  0.3 – 0.5 gm/lit of water 
Benevia Insecticide  Cyantraniliprole 10.26% OD  1.7 – 2 ml/lit of water 
Dhanpreet Insecticide  Acetamiprid 20% SP  0.2 – 0.4 gm/lit of water 
Tatamida SL Insecticide  Imidacloprid 17.8% SL  1 – 2 ml/lit of water 
Police Insecticide  Fipronil 40% + Imidacloprid 40% WG  0.2 – 0.6 gm/lit of water 
Osheen Insecticide  Dinotefuran 20 % SG  0.3 – 0.4 gm/lit of water 
Movento Energy Insecticide  Spirotetramat 11.01% + Imidacloprid 11.01% SC  0.5 – 1 ml/lit of water 


Discover more about diseases and insect-pests affecting okra: symptoms and control measures. CLICK HERE

Paddy Gall Midge: An Integrated Pest Management Guide

0
Paddy Gall Midge: An Integrated Pest Management Guide

The Paddy Gall Midge, which is scientifically known as Orseolia oryzae is an insect pest that attacks paddy crops. It is a significant threat to the rice crop in many parts of India, causing severe damage to the yield and quality of the crop. This paddy gall midge is mainly found in irrigated conditions during the tillering stage of the rice crop. Cloudy or rainy weather favors the population density of rice gall midge. They are orange colored mosquito like fly, which undergoes several stages of development including egg, larva, pupa and adult. 

Type of Infestation

The Paddy Gall Midge infests the rice crop, primarily attacking the stem of the plant. It causes a characteristic swelling or gall formation, which provides the larvae or nymphs with food and protection. The pest can infest the rice crop at any stage of its growth, from seedling to maturity, but it is most severe during the vegetative and reproductive stages of the plant.    

Scientific Name: Orseolia oryzae 

Most Affected States Due to Paddy Gall Midge

The Paddy Gall Midge is a significant threat to the rice crop in many parts of India, but it is most severe in the states of Tamil Nadu, Kerala, Karnataka and Andhra Pradesh 

Symptoms of Paddy Gall Midge

The Paddy Gall Midge infestation causes several damaging symptoms or signs on the rice crop,  

  • The most characteristic symptom of paddy gall midge infestation is the formation of a gall or swelling on the rice plant’s stem. The gall is caused by the larvae or nymphs of the pest, which feed on the stem’s inner tissue, causing it to swell. 
  • Onion leaf or silver shoot is the most common symptom caused by paddy gall midge. 
  • Infested tiller fails to produce panicles. 
  • The Paddy Gall midge infestation can also cause stunted growth of the rice plant. 

Control Measures

An integrated Pest Management measures includes cultural, physical, mechanical, biological and chemical method which is often required to control paddy gall midge effectively. 

Paddy Gall Midge Cultural Measures

  • Cultivate gall midge resistant paddy varieties like IR 36, MDU 3, Shakti, Jyoti, Vikram, Sureka. 
  • Deep ploughing helps to bury the larvae and pupae of the pest, preventing their emergence. 
  • Early planting is recommended as it can help in reducing the prevalence of gall midge. 
  • Maintain field sanitation by destroying affected crop debris and weeds. 

Paddy Gall Midge Physical Measures

  • Solar Light Trap can be used to trap and kill paddy gall midge. Since the gall midge adults are active during the evening hours, it is recommended to install light traps at a rate of 1 trap per acre between 6.00 PM to 9.00 PM in order to attract them. 

Mechanical Measures

  • Barrix Magic Sticker Trap Yellow Sheet attracts the adult gall midges and kills them. For an acre, use 10 sheets of sticky trap and place them above the plant foliage for effective trapping. 

Paddy Gall Midge Biological Measures

  • Release Platygaster oryzae, an egg larval parasitoid of gall midge at the rate of 1 per 10 square meters in the main field on the 10th day after transplanting. 
  • Introduce the carabid beetle, Ophionia indica, which is an effective predator of gall midge. 
  • Greenpeace Neemol Bio Neem Oil Insecticide contains neem-based products azadirachtin which when used at the rate of 1-2 ml per liter of water with 15 days interval between each spray can effectively control gall midge in paddy fields. 
  • Anshul Bio Finish is a broad spectrum biopesticide containing active ingredients derived from many plants. Use Anshul Bio Finish biopesticide at the rate of 3-5ml per liter of water at regular intervals of 10-12 days for effective control of midges. 

Paddy Gall Midge Chemical Measures

Some of the commercial chemicals that are used to control rice gall midge includes, 

Product Name  Technical Content  Dosage 
Reeva 5 Insecticide  Lambda Cyhalothrin 5 % EC  2 ml/lit of water 
Shamrock CP Gold Insecticide  Chlorpyriphos 20% EC  2.5 ml/lit of water 
Anant Insecticide  Thiamethoxam 25% WG  0.3-0.5 gm/lit of water 
Marshal Insecticide  Carbosulfan 25% EC  2 ml/lit of water 
Fax SC Insecticide  Fipronil 5 % SC  2-3 ml/lit of water 


Major Insect-Pests Of Paddy Crop And Their Control MeasuresSee more

Management Of Dusky Cotton Bug In Cotton 

0
Management Of Dusky Cotton Bug In Cotton 

Cotton is considered as one of the most important cash and fibre crop in India. It is often called ‘White Gold’ due to its economic importance. However, cotton plants are also vulnerable to various insect pests that can cause significant damage to the crop. One such pest is Dusky Cotton Bug. This bug feeds on the sap of cotton plants, leading to significant damage to the leaves and bolls of the crop.  Dusky Cotton Bug is typically brown or grey in color and has a triangular-shaped body with transparent wings.  

Type of Infestation

Dusky cotton bugs are a type of sap feeder, which sucks the sap from developing seeds in open bolls and causes lint discoloration.  

Scientific Name: Oxycarenus hyalinipennis 

Most Affected States

The exact distribution of Dusky Cotton Bug in India is not well documented. However, they are a known pest of cotton plants and are likely present in cotton-growing regions of the country.   

Symptoms of Dusky cotton Bug

  • Both nymphs and adults suck the sap from developing seeds, ultimately reducing the weight and viability of seeds. 
  • Discoloration of lint. 
  • Affected seeds become shrunken and discolored. 

Control Measures

The management of Dusky Cotton Bug on cotton plants can be achieved through an integrated approach that includes cultural, biological and chemical measures. 

Cultural Measures

  • Eliminating alternate host plants, such as okra, can help reduce the infestation of the dusky cotton bug. 
  • Early harvesting helps to minimize the damage from Dusky Cotton Bug. 

Physical Measures

  • Collect and destroy the nymphs and adults of dusky cotton bug by shaking the bolls into vessels with kerosene water. 

Biological Measures

Ecotin Insecticide is a neem based biological insecticide containing Azadirachtin, which can be used effectively to control dusky cotton bugs. The recommended dosage is 0.4 – 0.7ml per liter of water. 

Chemical Management

Some of the commercially available chemicals for controlling dusky cotton bugs are mentioned below, 

Product Name  Technical Content   Dosage 
Battalion Insecticide  Thiamethoxam 25% WG  0.5 gm/lit of water or 100 gm/acre 
Katyayani IMD 178  Imidacloprid 17.8 % SL  0.25 ml/lit of water or 50 ml/acre 
Hifield Ag Pyramid Insecticide  Acetamprid 20% SP  0.5gm/lit of water or 100 gm/acre 
Anshul Chlocip Insecticide  Chlorpyriphos 50% + Cypermethrin 5%EC  2 ml/lit of water or 400 ml/acre 


PMFBY Goes Digital: Automated Claim Settlement For Aatmanirbhar Farmers

0
PMFBY Goes Digital: Automated Claim Settlement for Aatmanirbhar Farmers
Settlement for Aatmanirbhar Farmers

A digitized claim settlement module called ‘DigiClaim’ was launched under the Pradhan Mantri Fasal Bima Yojana (PMFBY) by Union Minister of Agriculture & Farmers Welfare, Shri Narendra Singh Tomar on March 23rd, 2023. The module aims to disburse claims electronically to insured farmers in a time-bound and automated manner. With the launch of this module, claims totaling Rs 1260.35 crore have been disbursed to farmers in six states, and the automated claim settlement process will continue as and when the claims are released.

Overview

The DigiClaim Module has been launched under the ambit of Pradhan Mantri Fasal Bima Yojana (PMFBY) to disburse claims electronically to insured farmers in a time-bound and automated manner. Insurance claims totaling Rs 1260.35 crore have been disbursed to farmers in six states, including Rajasthan, Uttar Pradesh, Himachal Pradesh, Chhattisgarh, Uttarakhand, and Haryana with the click of a button and the process will continue whenever the claims are released.

The government is collaborating closely with all the states that have withdrawn from the scheme, and Andhra Pradesh and Punjab are set to rejoin the program. Telangana and Jharkhand have also expressed their interest in returning to PMFBY. The implementation of the DigiClaim Module has been made possible through the integration of the National Crop Insurance Portal (NCIP) and the Public Finance Management System (PFMS). Real-time tracking of the claim settlement process will be possible for farmers on their mobile phones, enabling them to benefit from the scheme.

The DigiClaim Module aims to expedite the claim disbursal process of valid crop loss claims and directly impact the claim reversal ratio, which is expected to go down with DigiClaim. The initial phase of launching the Farmer Grievance Portal in Chhattisgarh has garnered a positive response. The second phase will see the implementation of the portal across the country. The DigiClaim Module is another feather in PMFBY’s cap in its ongoing effort to usher in advanced technological solutions such as automated calculation and disbursement of crop insurance claims.

Important Information

  • The digitized claim settlement module called DigiClaim Module has been introduced under the PMFBY.
  • Insured farmers will receive sustainable financial support through the automated claim settlement process.
  • The insured farmers under PMFBY have received a claim amount of Rs 1.32 lakh crore till date.
  • The “Meri Policy, Mere Haath” campaign has been monumental in enhancing the awareness of PMFBY at the grassroots levels.

Conclusion 

The government has taken a significant step towards the development of farmers by launching the DigiClaim module under the Pradhan Mantri Fasal Bima Yojana (PMFBY) to disburse crop insurance claims electronically. Farmers will be able to track the real-time progress of their claim settlement process and benefit from the scheme by using their mobile phones due to these technological advancements. The government is also working closely with the states to ensure timely uploading of yield data onto the crop insurance portal and releasing the states share on time to transfer claims to farmers bank accounts in a hassle-free manner. This technological advancement and integration of innovative technologies such as Yes-Tech, WINDS and CROPIC fall in line with PM Modi’s vision of making India a digital powerhouse with more technology-driven innovations paving Ease of Living for farmers.

Nursery Raising: The Key To Strong And Healthy Seedlings 

0
Nursery Raising: The Key to Strong and Healthy Seedlings

Sowing healthy seeds or planting healthy seedlings is an important factor in achieving a healthy and productive crop. Seedlings are raised in nurseries for various crops, including vegetables, fruits and ornamental plants. Explore the benefits and challenges of raising seedlings in a nursery, as well as the best practices for seedling care and management in this article.  

Seedlings of crops propagated in nursery: 

Seeds of certain crops are first raised in nursery under protected conditions to achieve maximum germination count and healthy plant establishment and then transplanted to main field. 

Most commonly grown crops in nursery: 

  • Vegetable crops: Tomato, Chilli, Brinjal, Onion, Cucurbits and Brassicas such as Broccoli, Cauliflower, and Cabbage.  
  • Fruit crops: Apple, Peach, Grapevines, Citrus (Oranges, Lemons, Lime), Strawberry, Kiwi.  
  • Ornamental crops: Roses, Marigold, Chrysanthemum, Lily, Gerbera, Tuberose. 
  • Field crops: Paddy, Sugarcane, Tobacco.
  • Plantation crops: Coconut, Tea, Coffee, Rubber, Oil palm. 

Why is Growing Seedlings in Nursery Important? 

  • Nursery provides better control over environmental factors such as temperature, light, and moisture, ensuring optimal growing conditions for seedlings. 
  • It allows farmers to monitor the plants more closely, making it easier to identify and treat any pest or disease problems that do arise.  
  • Seedlings grown in nurseries are generally healthier and more robust, making them more likely to survive the transplanting process and establish themselves in the field. 
  • They can be managed more efficiently in terms of water, fertilizers, and other inputs, which can reduce waste and costs. 
  • The seedlings tend to be more uniform in growth and development, leading to more consistent crop quality and easier management. 
  • Have less loss of expensive seeds due to proper germination. 

Components and process involved in nursery raising system: 

Choosing the right location for a nursery:

Nursery area should receive adequate sunlight to ensure proper growth. Choosing south-west aspect of placing nursery is preferable. Select nursery area having adequate drainage facilities to avoid water logging conditions. It should be selected near a water source and generally near shaded areas. In case of field nurseries, artificial shade can also be provided through shade nets if required. In addition, nursery areas should have sufficient organic matter content.  

Types of nurseries:

Nurseries can be raised in both fields as well as in protected structures like green houses and shade net houses.  

  • Field Nursery: Nurseries in the field can be of two types – flat bed and raised bed nursery. Soil should be free from any weeds, clods and stubbles. In general, prepare raised beds of 1 – 1.2 m width, 15 cm height and of convenient length. Flat beds can be prepared in case of sandy soils which have good water draining capacity. 
  • Protected Nursery: Under protected structures such as poly house / green house and shade nets, poly bags and protrays are generally used for raising seedlings. The number of cells vary depending upon the tray. Usually trays with 98 cells are preferred. Size of the cell is important as it controls the amount of media used as well as water holding capacity. Polybags can also be used in greenhouse nurseries.  

Selection of Growth Media:

The chemical and physical properties of the growing media are a key factor for successful nursery production. Optimum root growth is largely dependent on physical characteristics of media like moisture, aeration and nutrient holding capacity of the media. Sterile growing media must be used. Sand and compost are the most commonly used media. Coco peat, which is a byproduct of extraction of fiber from coconut husk a 100 % natural, biodegradable, spongiest and fibrous material is also normally used as main ingredient of nursery protray growing media. It has a high C: N ratio and high water holding capacity. It is a very good substrate for soil less cultivation in greenhouse vegetable nurseries. Other growth media includes peat moss, vermiculite, perlite and pumice.  

A mixture of growth media can also be used for healthy growth of seedlings. For instance, 1:1:1 ratio of red soil, sand and FYM mixture is used for growing watermelon seedlings. For additional benefits to growing seedlings mix biofertilizers like Trichoderma viride or Pseudomonas fluorescens  to media. Approximately 1.2 kg of cocopeat is required for filling one portray with 98 cells. 

Selection of Seeds or Vegetative propagules:

Select high quality seeds with germination percentage of at least 90%. It should also have high vigour. The selected seeds should be free from seed borne diseases. Also, select healthy and vigorous vegetative propagules (cuttings, grafts, layers) from the parent plant at the appropriate time of year, that are free from pests and diseases. Ensure that selecting seeds or propagules that are adapted to local growing conditions will increase the chances of success in the nursery. In order to prevent damping off, treat the seeds with Trichoderma viride at 6 ml/kg seeds or Carbendazim at 2 gm/kg seeds before sowing. 

Sowing and Germinating seeds in a nursery:

Prepare the nursery beds (field nursery) and fill the protrays / polybags (protected nursery) with the growth media. Sow 1 – 2 treated seeds per cell or per hole at 1 cm depth. Cover the seeds with the growth media. Adopt line sowing in nursery beds. Black polyethylene sheet or dry straw or grass can be used to cover the portrays or beds after sowing to conserve moisture and facilitate warmer temperature to initiate germination.  

Tools and Equipment needed for a nursery operation:

Hand tools such as shovels, rakes, hoes, trowels, and pruning shears are required for preparing the growing medium, planting, and pruning the seedlings. Rose cans are necessary for watering the seedlings. Use mini sprayer to spray pesticides in nursery.  

Management of young nursery seedlings:

  1. Irrigation: Seedlings should be irrigated regularly with low pressure for better growth and development of the seedlings. Irrigating with Rose can, overhead irrigation, drip irrigation or sub-irrigation can be used to irrigate the seedlings. Overwateringis also dangerous for the growing seedlings as there might be chances of developing foliar diseases, collar and root diseases. Watering can be done in the morning. Proper drainage is essential to prevent waterlogging.
  2. Nutrition: Nutrition for growing young seedlings is very much necessary apart from the nutrients present in the cocopeat or growing media. Supplying nutrition can be organic or inorganic. FYM can be incorporated while preparing the beds for sowing. Spray NPK 20:20:20 fertilizer once at 12th day after germination. One micronutrient mixture spray can be given 15 days before transplanting. Deficiency of any nutrients may lead to poor and stunted growth of plants and resulting in poor performance.
  3. Pests and Disease management: Common pests in nursery include cutworms and sucking pests (aphids, leaf miners, scales, mites). Common diseases include collar rot, damping off, wilt. Drench the soil with Trichoderma viride at 10 gm/lit water or Mancozeb 75% WP at 3 – 4 gm/lit of water to control damping off, root rot, collar rot and other soil borne diseases. Regularly inspect the plants for signs of pest infestation and disease incidence. Follow field sanitation and remove the infected leaves and plants. Give a biweekly spray of neem oil at 1 – 2 ml/lit of water.

Hardening off seedlings before planting in the field:

Hardening is the process of gradually exposing grown seedlings to the normal climatic condition from protected condition to reduce stress and transplanting shock when seedlings are transplanted to the main field. Hardening may be done about 7 – 14 days before transplanting, by increasing light intensity slowly or exposing transplants/seedlings under full sunlight, reducing fertilizer application and watering.  

Transplanting the seedlings:

The right time of transplanting seedlings depends upon the crop.  

Transplanting time for few crops: 

  • Tomato: 25 – 28 DAS / 5 – 6 true leaf stage 
  • Chilli: 40 – 45 DAS 
  • Muskmelon: 20 – 30 DAS 
  • Onion: 42 – 48 DAS 
  • Brinjal: 30 – 35 DAS 
  • Marigold: 30 DAS  
  • Chrysanthemum: 30 – 40 DAS 
  • Cauliflower: 25 DAS 

A thumb rule to decide the time of transplanting the seedlings or age of seedlings required for transplanting is the plant should at least spend 1/4th of it’s life cycle in the nursery. 

Common mistakes to avoid when raising seedlings in a nursery: 

  • Watering seedlings too often or too much can drown them or lead to fungal diseases. Only water when the topsoil is dry and use a well-draining soil mix. 
  • Similarly, neglecting to water seedlings enough can cause them to wilt and die. 
  • Avoid using irrigation water with high soluble salts as it will hamper seedling growth by salt accumulation. 
  • Seedlings have specific soil needs. Avoid using heavy, compacted soil or soil mixes that are too high in nutrients, as this can cause problems with root development. 
  • Planting seedlings too deep can inhibit root growth and lead to stunted growth. Make sure to plant seedlings at the right depth. 
  • Adopting wrong spacing can either reduce the number of seedlings or cause overcrowding.  
  • Poor ventilation can lead to fungal diseases and hinder seedling growth. Make sure to provide adequate air circulation and avoid overcrowding seedlings. 
  • Neglecting to harden off seedlings can cause stress leading to stunted growth or death. 
  • Failing to monitor pests and diseases can cause quick spread in a nursery and devastate young seedlings.