Mushroom Cultivation has become a primary source of income for several unlikely farmers and a popular second income option for many. Government subsidies for mushroom cultivation have made it more accessible for individuals. A mushroom cultivation government subsidy was introduced in 2011 under the National Horticulture Board to promote mushroom production and help farmers with their endeavours. This mushroom cultivation subsidy provides financial assistance for the farmers to set up their mushroom production plants. The offer is available for individuals and provides a substantial cost as well.
Scheme Overview
- Scheme Name: Subsidy on Mushroom Cultivation
- Scheme Modified: 01.07.2011
- Scheme Fund Allocated: Up to 10 lakhs
- Type of Government Scheme: Agriculture Subsidy Schemes under NHB
- Sponsored / Sector Scheme: Mission for Integrated Development of Horticulture (MIDH)
- Website to apply: https://nhb.gov.in
- Helpline No: Phone lines are different for each state.
- Subsidy Type: National Subsidy
- Covered States: The Mushroom Cultivation Subsidy covers all states across India, including Andhra Pradesh, Arunachal Pradesh, Assam, Bihar, Chhattisgarh, Goa, Gujarat, Haryana, Himachal Pradesh, Jammu and Kashmir, Jharkhand, Karnataka, Kerala, Madhya Pradesh, Maharashtra, Manipur, Meghalaya, Mizoram, Nagaland, Odisha, Punjab, Rajasthan, Sikkim, Tamil Nadu, Telangana, Tripura, Uttar Pradesh, Uttarakhand, and West Bengal.
Features of Mushroom Subsidy
Under the directives of the National Horticulture Board, the subsidy for mushroom cultivation is provided in the Mission for Integrated Development of Horticulture (MIDH). The main features of this mushroom subsidy are,
- As per this subsidy on mushroom farming, it is the state government that will issue the loan.
- The cost of the mushroom plant is set to a maximum of 20 lakhs. A 50% of the total cost, i.e., up to 10 lakhs of the loan, will be provided.
- This will be in addition to other government subsidies for mushroom cultivation in the form of a 50% discount on compost.
| CATEGORY | REMARKS |
| Subsidy cost | Up to 10 lakhs |
| Who is eligible | Individual farmers |
| What is included? | Mushroom plant set up, composting units, and spawn production. |
Benefits of Mushroom Cultivation Subsidy
- Subsidy for mushroom farming is available for individuals or a joint venture.
- There is a substantial subsidy offer for mushroom farming with assistance with the setup and compost.
- It is an integrated scheme where the issuer is the state government, so that communications will be much easier and more convenient.
- The subsidy is issued per unit, so you can set up as many units as you need.
Drawbacks of Mushroom Farming Subsidy
- The subsidy is applied per unit, and with a cap of 10 lakhs per applicant, you can only have the subsidy for 100 units. You may not get the same benefits for all your units if you have a larger farm.
- The subsidy rates are higher for those in the hilly and colder regions than in other areas, which can be a slight disadvantage for all in the planer parts.
- Only individuals are eligible for the mushroom subsidy, so companies cannot apply for the same.
How to Apply for a Subsidy in Mushroom Farming?
The subsidy is either issued by the NHB or from the Bank directly as a loan. The application procedure and the necessary documents are more or less the same. If the subsidy must be from the Bank, you will need more documentation and then apply to the NHB with the supportive documents. The process of application is,
- Step 1- In the application for the mushroom subsidy loan, you can approach the Bank with the relevant details and then apply for the subsidy with the NHB in the given link.
- Step 2 – The application process must include all the necessary supportive documents.
- Step 3 – There will be site inspections and validation of the facts provided before the subsidy is issued.
Documents Required for Mushroom Farming Subsidy
- Completion certificate of the project
- Financial appraisal by the Bank
- Loan sanction letter from the Bank
- Loan disbursement terms
- A copy of the record of rights in the name of the beneficiary (you)
- Recent passport-size photograph
- Photographs covering all the major components of the project
- Expenditure certificate duly signed
- If the subsidy is to be issued by the Bank, you must submit an additional application.
- Aadhaar card
- Address proof
- Ration card
Conclusion
The NHB Subsidy for Mushroom Cultivation is a blessing for small to medium-scale farmers who get assistance for the complete setup and reduction in compost cost, including transportation and setting up individual compost units. You can contact the state government authorities for more enquiries and understand the procedure for starting your mushroom cultivation unit.
Explore our Complete Guide to Profitable Mushroom Farming in India for essential tips and tricks to boost your mushroom cultivation!
Note: The information contained herein is for informational purposes only. Nothing herein shall be construed to be financial or legal advice. Pesticides are a considerable risk of loss in crops and viewers are advised to do their own research before making any decisions.


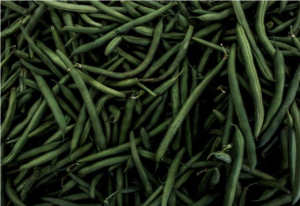 Finally, it’s harvest time! Hydroponically grown beans harvest faster than those grown traditionally. Green beans should be harvested young before they mature and lose their crisp and freshness.