Soybean counts among the world’s most essential pulse crops, plus it contains plenty of protein and fulfills oil needs. Soybean efficient production is a limitation related to abiotic and biotic factors and crop management operations.
The soil fertility and nutrition contribute to the soybean crop’s high-yield production. Manage the right amount of nutrients in the soil; there must be a combination of fertilizers.
Organic matter, compost, NPK, and manure are proven best fertilizers. Let’s read about them to understand how and when to apply them.
Manure is the powerhouse of potassium, phosphorus, and other micronutrients. The yield takes a different direction due to excess nitrogen, and yet the measurement of nitrogen before mixing is essential. The nitrogen may affect the growth of soybean crops in other ways, so producers avoid (N).
The optimum utilization of fertilizers in boosting the yield also shows excellent results in grain production. The fertilizer practice enhanced the species’ growth.
However, measuring various fertilizers should be vital to direct the growth on a positive path.
Must fertilizers for the soybean crop
Nitrogen
Nitrogen contributes a prominent role in the growth of soybean crops, is an essential part of chlorophyll and boosts overall crop development. In micronutrients, nitrogen, phosphorus, and potassium are mixed as the best fertilizer, which produces energy and offers nutrients.
Potassium
Potassium is not less than any other fertilizer and plays a vital role in fertilizer mix. It keeps pests and diseases at bay and directly nourishes the soybean crop’s fruits. In the fertilizer mixture, 20 parts of potassium contribute to the fertilizer mix.
A soil test must happen before sowing to analyze the need for Potassium. Keep the crop seeds away to prevent salt injury. Potassium is mixed maximum in the fertilizer mix as the soybean crop needs it most for growth.
Phosphorous
Phosphorous helps in photosynthesis as it converts solar energy into food for the crop. The fruits get the right shape due to phosphorous, plus it derives the micronutrients from the surrounding soil. The contribution in fertilizer mix is 15-10 parts only to keep the soil happy.
Sulphur, Magnesium, and Iron
Calcium, Magnesium, Iron, sulphur, and zinc are the other nutrients that contribute to optimum growth by boosting photosynthesis. It also covers pests, insects, and diseases in roots, stems, and fruits. Boron helps in producing a fresh set of fruits from the soybean crop.
Soybean seeds
FAQs
1. What is the NPK ratio?
– In the northern plain, the ratio of NPKs is 20:60:40:30 plus zinc 5 kg/zn through zinc sulphate.
2. What is fertilizer application?
– As a basal dressing, the ratio of N is 25kg, K2O is 40kg, P204 is 60 kg, and 30kg S is gypsum. 25kg ZnSO4 is the amount of irrigation required in soil.
– Apply 400mg/l foliar spray of NAA and salicylic acid 100mg/l once in 15 days.
Note: The information contained herein is for informational purposes only. Nothing herein shall be construed to be financial or legal advice. Pesticides are a considerable risk of loss in crops and viewers are advised to do their own research before making any decisions.
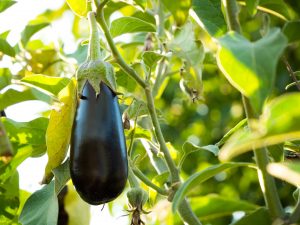
Brinjal is in the Solanaceae family and is a typical tropical vegetable grown in India and globally throughout the year. Eggplant, garden egg, badanekai, vankaya, baingan, aubergine, and vangi are some famous names of Brinjal. Pests, diseases, and pathogens create hindrances in brinjal farming.
Brinjal cultivation is low-maintenance and usually requires 26° during the day and 18° at night, preferably high temperature for high yield. Calcium, phosphorus, and iron are common nutrients in every variety of brinjal cultivation. Crop rotation, vermicompost, manure, and biological pest control are the techniques of organic brinjal cultivation.
Let’s read about other aspects of brinjal cultivation.
Prolonged warm weather is ideal for Brinjal cultivation. A good amount of water and complete sunlight is the top requirement of brinjal cultivation. A temperature between 13-21° is suitable. Well-drained soil alongside organic matter is preferred. The best time to sow the brinjal crop is between rainy-summer seasons. Sandy and clayey soil produce early and high yields in brinjal.
Maintain the pH of around 6.5-7.5 of soil mixed with organic matter.
Planting procedure
The brinjal seeds are sown in the nursery bed to raise seedlings for transplanting in the field. The soil is left to get warm for 8-12 weeks and get over the last frost for a better yield of the next crop.
In sandy soil, flatbeds are sown with seeds, and raised beds are prepared to avoid water logging in heavy mud. The distance between two beds for watering and air circulation must be 70 cm, and 7.2 x 1.2m & 10-15 cm height is the ideal measurement for raised beds for brinjal cultivation. Drench the soil with bavistin at 2 gm/litre of water.
transplant the seedlings 2-3 feet apart in a double row or set them 18-24 inches away from the raised beds. Black plastic mulch is used to warm the soil in long springs. During the farming season, mix organic matter every two weeks in the ground.
Cover the soil with dry straw and sugarcane grass to maintain moisture and temperature. Transplanting within 4-6 weeks produces a good yield.
Irrigation requirement
For a fuller development of brinjal hybrid varieties, optimum water supply is the priority in brinjal cultivation. In summer, irrigation in 3-4 days and 7-12 days in winter is preferred. Do not irrigate excess in the early stage.
Otherwise, the damping-off disease will attack and damage.
Optimize the available water through drip irrigation. Avoid under-watering and over-watering. Keep it moist. Irrigation is a crucial aspect of high-yielding brinjal.
Harvesting of Brinjal
Brinjal cultivation
The brinjal harvest starts after attaining full size and color and before the ripening phase. Check the firmness of the vegetable; if it’s tender and glossy, harvesting is done. Don’t pull the Brinjal directly; use garden scissors for harvest. The glossy finish, dense color, and perfect size are signs of the optimum time to harvest the brinjal.
FAQs
Q1. What is the brinjal yield per acre?
– The brinjal yield per acre depends on various factors like the season, location, and hybrid seeds. A change in any one of the factors changes the yield. But the expected yield is 200-300 quintals per hectare.
Q2. Name some varieties of Brinjal.
– Pusa purple long or round or cluster, Azad Kranti, Arak Keshav or harshitha or shirsha or kusumkar or Navneet or Nidhi, Punjabi Bahar, and many more.
Note: The information contained herein is for informational purposes only. Nothing herein shall be construed to be financial or legal advice. Pesticides are a considerable risk of loss in crops and viewers are advised to do their own research before making any decisions.
Are you tired of following a million steps in cabbage cultivation? Don’t worry, We have curated the 15 most important steps needed to follow for getting higher cabbage production.
A brief guide to the 15 important steps to boost cabbage production which covers all necessary aspects of cabbage farming.
What type of manure is suitable for cabbage plants?
Name the high-yield variety of cabbage plants.
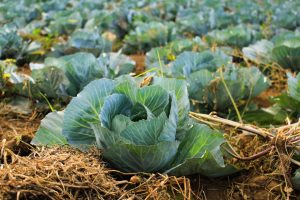
Introduction to cabbage cultivation
Cabbage is an annual crop and is cultivated globally in different regions. Cabbage’s various colors include green, red, purple, and white. The white and red color has low availability, but green and purple are found almost across the globe.
The cabbage plant is an annual leafy plant that varies due to size, quality, growing & maturity phase, and transplant season. After potatoes, Cabbage is the second largest green vegetable crop and the most popular daily.
Quality, taste, and shelf life can be boosted by following a proven roadmap of 15 steps. Without further ado, let’s jump into the article.
Cabbage plant
1. Climate and soil requirement
Sandy, medium-textured and heavy soil that is moist and eliminates water logging is ideal for cabbage plants. Fertilizers, organic matter, compost, and manure rich in nutrients are required to grow high-yield cabbage. The early phase plant prefers light soil with moisture, and the last stage prefers heavy soil.
Fertilizer, soil, and climatic conditions play a significant role in the cabbage’s quality production and maximum growth. The farmer must test the soil’s pH level as it directly affects its nutrients, growth rate, and microorganism activity.
2. Selection of site and land preparation
Choose a farm with no history of growing Cole crops such as Cabbage, broccoli, cauliflower, and Brussels sprouts. It will prevent the disease from attacking the cabbage plant early on. Treat the soil with aged compost, manure, and organic matter, nutrients to the crop at the initial stage.
3. Selection of premium varieties
Savoy, red and green is the three wide varieties of cabbage plants. Savoy cabbage plant is yellow-green with high yield; the green cabbage plant is a combination of light-dark green, and the red cabbage is crimson-purple in color with smooth texture.
4. Suitable seasons for plantation
Climatic conditions, method of farming, variety of cabbage plants, and area of farming decide the suitable season for cabbage cultivation. Like, in the plains, July-November is convenient, and April-August is ideal for hilly regions.
5. Increase Cabbage growth
Before planting, treatment includes mixing the farm soil/bed with aged manure and organic compost for 5-7 cm and turning it to 30cm. The pH level should lie between 6.5-6.8 cm and be adjustable to 7cm by adding extra lime to prevent diseases.
Mix nitrogen in areas with sandy soil and fill the earth with cottonseed or nitrogen-rich meal to hike the growth and increase the leaf in the cabbage plant.
6. Plantation tips
Grow the cabbage plant in well-drained soil under the sun in cold weather to get total growth of the crop. Rich nutrients from aged compost build the capability of fighting disease and pests while growing.
7. Fertilization
Cabbage requires a lot of nutrients from sowing to the development phase into a giant head cabbage plant. Apply a basal dose of fertilizers according to recommendations and the soil test report. Avoid spray fertilizers as they can damage the leaf quality and manual application of fertilizer is preferred for cabbage.
Regularly irrigate the field in order to maintain the soil moisture and nutrients that reach the cabbage plant. Avoid fertilizer while developing the head as it could lead to rapid growth and cracked heads. Know the nutrition profile of soil and then decide the proportion of the earth.
8. NPK Fertilization
Nitrogen, potassium, and phosphorus are great agents for soil nutrients and the development of the cabbage plant. During soil preparation, mix 12 tonnes of compost or FYM per acre plus NPK in 36:36:36 kg/acre. Apply the half amount of nitrogen 30-45 days after planting.
Calcium helps in absorbing ground water and boosts leaf growth. A deficiency of any nutrients can turn the leaves bitter, hard and pale. Spread urea solution and liquid fertilizer to increase production.
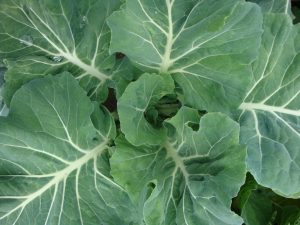
9. Reason behind small or no head in cabbage
Cabbage plant
There are four major reasons for small heads, loose leaves, discolored leaves, and puffy heads which are:
– High temperature
– Over or less fertilization
– Insufficient irrigation
– Excess or less nitrogen
Always consider testing soil, climate, and crop variety before the application of fertilizer, water, compost, nitrogen, and other fertilizers. Either extra or less quantity can become a hindrance in the development of cabbage plants.
10. Reason behind holes in leaf and wilting in Cabbage
Cabbage looper, yellow striped caterpillars, and adult brown nocturnal eating the leaves and making holes. Remove these insects from the hand by spraying chemicals.
11. Spacing between plants
Planting in the 5-4 levels, depth of 1/4 – 1/2 inches, and root depth of 2-5 feet boosts the profitability of the cabbage crop. Height of 12-15 and width of 24-20 inches plus a seed rate of 300-500 gm per acre is necessary.
12. Irrigation technique
The best irrigation prefers 3-12 days while keeping an eye on the climate, soil, and cabbage plant growth. Sprinkle and furrow methods to conserve and spread the right amount of water to crops.
Assess the groundwater level and water in 10-15 days and avoid flooding while developing the head. A thin layer of mulch helps in keeping the soil moist.
13. Pests and diseases in cabbage plant
Pests and diseases cause damage to the leaves and roots of cabbage plants. Here are the control methods:
Avoid too much fertilizer
Cover the cabbage plant when necessary
Patiently select premium quality seed
The farmer must use hybrid and variety resistance in cabbage farming.
14. Harvesting for cabbage plant growth
They are ready to harvest when curds appear soft and firm. Asian and Napa cabbage varieties are ready to harvest when leaves turn 12 inches long and 4-10 inches strong base head. Cabbage cultivation during winter crops is easy for transport and storage. Remove the damaged leaves and harvest the fresh cabbage plant.
FAQs
Q1. What type of manure is suitable for cabbage plants?
– The aged or old manure is best for the cabbage plant before sowing. Never treat your soil with fresh manure as it can cause human pathogen transmission to the crop. It can pop as a hindrance in the way of high yield.
Q2. Name the high-yield variety of cabbage plants.
– Pride of India, which is a medium size fruit with high-yield production.
– Baraka F1 is the heaviest cabbage plant weighing 4-6 kg with a green-blue color combination.
Note: The information contained herein is for informational purposes only. Nothing herein shall be construed to be financial or legal advice. Pesticides are a considerable risk of loss in crops and viewers are advised to do their own research before making any decisions.
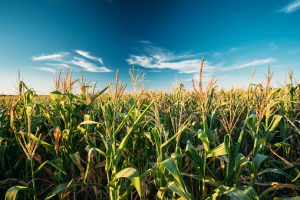
Maize rewards so much nutrition to our body but do you know where maize gains the food? Well, it gains nutrients from the soil, indicating the first requirement for maize farming. Only premium quality soil can take the load of maize, and to maintain the nutrient level of soil, it needs a regular boost.
Nutrients such as nitrogen, phosphorus, potassium, and organic fertilizers will rejuvenate soil fertility and soil nutrition. The maize crop is a stable food option and a significant crop for farmers in many parts of the world.
Let’s read about the fertilizers that are best for both soil and maize crops.
What is the pre-treatment of biofertilizer and seeds?
What are the options available in the Organic management of nutrients?
What is the ratio of NKP for maize crops?
Nutritional needs of maize crop
Maize farming
Maize crop requires high-level nutrition from soil which needs premium quality fertilizers. Perform a soil test before adding the proportion of fertilizer to the ground. Maize crop needs
40 % N, 25% P, 20% K, and the remaining small portion of micronutrients for better and high yield.
NPK and Zn are the best sources for crop growth and a good yield of maize, either organic or inorganic fertilizer, is required for the entire crop growth period. Fertilizer requirements for the maize crop will be based on selected varieties.
NPK and other nutrients for growth
Apply recommended NPK fertilizers as per soil test. If there is no soil test then adopt a blanket recommendation of 27.4 kg N, 4.8 kg P, and 18.4 kg K. per acre.
check for the extra husk or crop residue and organic waste present in the soil then we have to give nutrients as per the requirement of the soil and crop. Excess nitrogen can degrade soil fertility, and crop growth and reduce the yield of the crop.
Phosphorus helps in the overall development and root growth of crops. It also reduces resilience and frostbite.
Potassium plays a vital role in regulating water, and sugar in the crop. Potassium is essential at the mid-stage i.e., cob initiation and silking stage of maize crop.
The application of micronutrients, like calcium, sulfur, Magnesium, Boron, and zinc are great nutrients required for crops and soil which will help in the retention of soil fertility and also increase the crop yield.
Manure & Compost
To increase the productivity of the maize crop, well-decomposed compost is necessary. Mix the soil with FYM of 4-5 tonnes per/acre 25 days before sowing the crop in order to increase soil fertility, crop growth, and crop yield.
Fertilizer requirement for irrigated and rainfed maize
For Irrigated maize, choose FYM or compost at 4-5 tonnes per acre during land preparation before sowing, application of 1-2 kg of Azospirillum will help in increasing the soil fertility for good crop growth.
Follow the same amount of FYM or compost or coir pith in rainfed soil and spread it. Next, take ten packets of Azospirillum and phosphobacteria, or 4 kg of Azophos, and leach in the ground. Rainfed maize crop needs more fertilizer than compared to irrigated maize crop.
FAQs
Q1. What is the pre-treatment of biofertilizer and seeds?
Ans. Seeds must be treated with 600g/ha of Azospirillum and phosphobacteria.
Q2. What types of organic fertilizers are used to improve the nutrients in maize crops by adding soil?
– There are the best four fertilizers options that can help the growth and add the right amount of nutrients for the maize crop:-
Green manuring.
Application of soil Azospirillum/Azotobacter with VAM and PSB.
add straw or compost and leave 10-30% of crop residues like wheat, paddy, and maize crop.
Pre-treatment of regular and hybrid seeds.
Q3. What is the ratio of NPK for maize crops?
– Make sure to check the requirement of NPK in the soil and prepare a balanced mixture of 140 N, 65 P, and 50 K – Kg/ha-1.
Note: The information contained herein is for informational purposes only. Nothing herein shall be construed to be financial or legal advice. Pesticides are a considerable risk of loss in crops and viewers are advised to do their own research before making any decisions.
Orange and red coloured carrots are everyone’s favourite because of their vibrant colour and sweet taste. The only hindrance to high-yielding carrot plants is damage caused by pests and diseases. Management of these diseases require preventive and control measures.
Let’s examine the article and discuss several diseases and pests with their preventive and control measures.
– The leaves of carrot plants will turn brown-green watery lesions which spread quickly and turn into yellow leaves. It kills the carrot plant in the shortest time.
– Prevention is keeping the warm conditions, and spraying fungicide in the early stage of the disease.
carrot plant
Cercospora leaf blight
– Appearance of petty, necrotic flecks in leaves which later turn into blown big patches. The lesions twist, curl and kill the carrot plant. Early-age seedlings get the majority of diseases.
– Prevention is crop rotation, seeds free from pathogens, and a regular spray of fungicides.
Downy mildew
– The leaves appear to develop a white fluffy texture along with huge yellow spots. Lesions mature fast on the leaves, and this disease is encouraged by foliage.
–Use pathogen-free seeds. Avoid planting too close and maintain uniform spacing.
Bacterial leaf blight
– Angular, small, and pale spots change shapes frequently with the watery lesions. Yellow halo and brittles, which damage the flowers, also appear. Poor care and sanitization make a home for disease.
– Assess the condition of the carrot plant and use bactericides and avoid the sprinkle irrigation method as prevention.
Cavity spot
– Symptoms occur in leaves plus roots such as elliptical, grey, and sunken lesions around the roots. It causes cracks and discolouration in the roots. Soggy and wet soil encourages the disease.
– Select the field with a clean history of disease and pests in the soil for carrot plantation. Over-irrigation and fertiliser can ruin the carrot crop.
Introduction to pests in Carrot plant
Carrot farming
Aphids
-The green & yellow colour insects hide inside stems and leaves and slowly distort the leaves, developing yellow patches and little shoots.
– Check the plants before transplanting; they must be free from Aphids. Use canola oil or neem oil that works best against aphids.
Carrot rust flies
– Appearance of tunnels on the taproots is the first symptom of Carrot rust flies. They fill the tunnels with rust and damage the carrot crop from the roots.
– For prevention, start harvesting carrot plants in blocks, and don’t forget to cover to prevent them from laying eggs.
Carrot weevil
-Black gloves and yellow leaves are the symptoms of this pest. The dark shade beetle and C-shaped white grubs are larvae that destroy carrot cultivation.
– As prevention, encourage crop rotation and manage sanitation
Root-knot nematodes
-Cracks, distorted and forked taproots are an early symptom of nematodes, reducing the yield by 40%.
-For prevention, the soil must be solarised before planting the carrot crop.
FAQs
Q1. What are the symptoms of Damping-off?
– If the seed is not germinating or rotting or the texture of the seeds is soft, then it’s time to take preventive measures. Fungi encourage the spread of disease. The disease can be prevented by keeping the soil warm and not wet or cool.
Q2. What is the prevention for flea beetles?
– The usage of a floating row helps create a shield around the young seedling.
– Early-stage plantation of carrot seeds keeps common diseases away from carrot farms.
– Garlic oil, organic matter, and neem powder or oil have a stinky smell which successfully keeps the pests out of the carrot crop.
Note: The information contained herein is for informational purposes only. Nothing herein shall be construed to be financial or legal advice. Pesticides are a considerable risk of loss in crops and viewers are advised to do their own research before making any decisions.
Do you want to grow a high-yield bottle gourd? We are here to help you with the best techniques to follow at each step from choosing the right type of soil to the right way to harvest.
What are the different varieties of bottle gourd seeds?
How to control weed in the organic bottle gourd seeds?
What is the seed rate and spacing in bottle gourd seeds?
Introduction to Bottle gourd
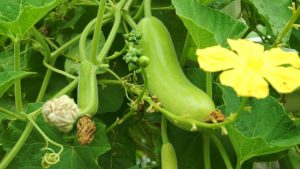
Bottle gourd is an annual, popular, and nutritious vegetable in India and worldwide.
Lagenaria sicerariais the scientific name and belongs to the cucumber family Cucurbitaceae. The most popular vegetable names are Lauki, dudi, and calabash, and the English name is Bottle gourd.
The unique name is derived from the bottle-kind shape of the vegetable packed with nutrients and 92% water. Bottle gourd seeds germinate with minimum care. Uttar Pradesh, Haryana, Bihar, and Madhya Pradesh are the states which produce this vegetable.
It grows in a high-temperature climate. Organic matters, aged compost, and manure are the best fertilizers to produce a high yield.
Let’s read about the growth phase aspects of bottle gourd seeds.
Bottle gourd farming
Soil & Climate
Early growth of the bottle gourd requires a minimum temperature of 180C, while ideal temps are between 24 and 270C. Although the crop can withstand low temperatures, extremely cold temperatures will stunt growth and cause the plant to die from frost. The plants can tolerate many different levels of rainfall. Although the bottle gourd may grow in a variety of soil types, it favours a sandy loam soil that drains well and is rich in organic matter. Although 6.0 to 6.7 is the ideal range for soil pH, plants may survive alkaline soils up to 8.0.
Location and land preparation
Leaf mold, manure, and compost are some organic matter that boosts the soil’s structure. Fertile, well-drained, loamy soil is the ideal soil for the cultivation of organic bottle gourd seeds. It grows best in between the summer- rainy season. It needs sufficient irrigation, and an area with water scarcity is unsuitable for bottle gourd cultivation.
Finely ploughed land like furrow and tilth with 2-3 metres distancing is the beginning of land preparation. Apply the FYM before planting with the distance between 1.0-1.5 m between each bottle gourd seeds. Soak the seeds in 600 ppm succinic acid for 12 hours or use water for soaking for 12-24 hours. It boosts the process of seed germination.
Planting process
Bottle gourd seeds are sown directly into small pits or soaked in water or succinic acid for 12-24 hours for early germination.
Usually, germination takes 6-7 days after planting.
To grow big fruits, mix potting soil, vermicompost, and coco peat equally to retain growth and moisture.
Build strong trellis support to the trail of the plant to grow maximum and spread. Keep the plant open to the sun.
Just after pollination, female flowers develop small gourds around them.
Bottle gourd seeds require 1-inch water weekly to keep the soil moist and loamy. Start watering in the initial stage to avoid diseases by sprinkling or furrowing to avoid direct pressure.
Pipes, wires, and bamboo are the best-proven support for trellis with a height of 5-6 feet.
Bottle gourd farming requires less cost and produces fresh produce in a short period.
Stages of bottle gourd seeds growth
Here is the sequence of growing stages in bottle gourd cultivation:
Sprouting set 6-8 days after sowing, the seeds germinate and visualize in sprout form.
Cotyledons are the rise of the first two fake leaves, which tear down automatically and begin the natural growth.
First leaves appear at the end of the second week over the Cotyledons.
The seedling stage is the growth of seedlings from the second week and forming small plants on beds.
Thinning is cutting weak seedlings and keeping only one in the spot. Cut the weak with scissors after the second week.
Bottle gourd seeds are sown 1-2 cm in depth. The perfect sowing time for bottle gourd seeds is March-February, July-June, and December-November months of the year to expect the best produce.
Irrigation
Furrow irrigation method is best to water the right amount in the right way to the bottle gourd seeds. The irrigation session for the bottle gourd seeds is pretty straightforward. After sowing, the seeds require water in intervals of 3-4 days and alternative days during flowering & fruiting.
Water the bottle gourd seeds at least 1 inch every week to keep it moist and enact. The practice drainage system in the rain for proper development and survival of initial and near harvest phase of bottle gourd seeds.
Manure
Mix good quality manure, vermicompost, FYM, cow dung, or liquid fertilizers in the 2:1 ratio. It will indulge more in the soil and nourish the bottle-gourd seeds.
Apply NPK at 15:15:15, around one tablespoon, and mix evenly in every single plant with vermicompost to get that extra boost.
How & When to harvest the bottle gourd
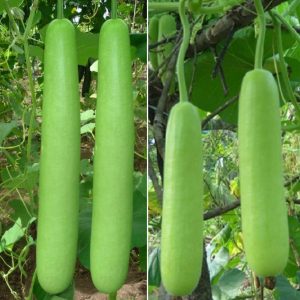
Bottle gourd farming
When the green colour of the bottle gourd turns pale to yellow, it’s the right time to harvest. Tender and medium plant crops are harvested according to the market demand. The various bottle gourd seeds are harvested between 60-70 days and stay fresh with a suitable storage facility.
Different varieties have a harvest gap of 3-4 days, so the picking must be active to avoid waste. The over-mature fruits are preserved for further bottle gourd cultivation. The session begins after 3-2 weeks of plantation and continues to around eight weeks for healthy and fresh produce.
FAQs
Q1. What are the different varieties of bottle gourd seeds?
– Here are the popular varieties of bottle gourd seeds:
Punjabi Barkat is Cylindrical, light green, and prone to mosaic disease.
CO1 is a pale green color with a bottleneck body.
PKM is extra long fruit (180-200) cm.
Punjabi Komal is a roundish shaped fruit with green color.
Punjabi Bahar is round and green-coloured fruit.
Q2. How to control weed in the organic bottle gourd seeds?
– The racking and weeding of soil is a regular practice to boost the organic development of bottle gourd seeds. Use plastic or organic mulch for mulching the crops developing in raised beds. During the growth phase, keep the amount of weed in control.
Q3. What is the seed rate and spacing in bottle gourd seeds?
– Seed requirement is 0.5 kg/acre and provides spacing of 45-60cm between plants and 2.0-2.5 m between rows of plants.
Note: The information contained herein is for informational purposes only. Nothing herein shall be construed to be financial or legal advice. Pesticides are a considerable risk of loss in crops and viewers are advised to do their own research before making any decisions.
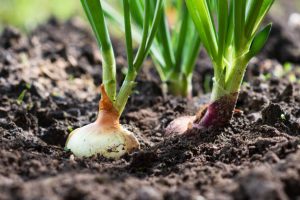
Onion farming is the process of growing an onion while following the sequence of tips, techniques, and steps. This article covers everything from sowing to soil preparation and checking climate conditions.
Cultivation of Onion – Brief introduction to sowing, plantation, irrigation, crop rotation and marketing of onion farming
Onion is one ingredient that is used in every household globally. Do you want to know in detail the unique aspects and factors of onion farming? You’ve come to the correct page; we will take you through a step-by-step guide on onion cultivation. Let’s dive into the directory.
Onion is found in every household and is a multipurpose vegetable worldwide. The onion farming business is ancient, profitable, and easy to follow. The bulk of farmers adopt the global cultivation of onions. Onion cultivation is accessible in several ways, including less care, attaining a good profit margin, and requiring less capital investment. In 2019, the worldwide production of onion was recorded as 4.5 million tonnes.
China is the number one country in onion production, holding 22% of the total output. South Korea, Mali, and Japan are in the next list of largest producers of onion farming.
Various varieties in onion farming define the quality and production of onion. The color and quality of the onion also change the protein, carbohydrates, and sulfur percentage. Let’s read about the aspects and factors of onion farming.
Onion Seed rate
7 – 9 kg/ha.
(note: 1 ha = 2.48 acres)
Suitable climatic condition for Onion farming
Onion farming has multiple stages; each step requires a different temperature set. The best development of the onion crop is expected in mild weather, not so warm, cold, dry or rainfall. The first stage, called the vegetable stage, requires 13-24 degrees, then for the bulbing stage 16-21 degrees, the last stage called maturity, and around harvesting onion needs 30-35 degrees.
Let’s know about the cultivation of onions in different seasons.
Rabi season – October to April
Kharif season – May to September
Late Kharif season – August to February
Soil preparation
Preparing soil includes mixing FYM, vermicompost, and poultry manure for high-yield produce. Make the soil fine by ploughing the land and mixing the manure and vermicompost into the soil. Inculcate FYM 20 tonnes/ha or 10 tonnes FYM or 5 tonnes vermicompost to increase the fertility and incorporate the organic compound in soil.
Form the Broad-bed or Flatbed furrow for planting the seeds with a uniform gap. The spacing must be 15x 10 cm for both beds.
Now, take 100% of P, K, and S along with 50% of N and after 30-45 days after transplanting, apply the remaining 50% of N in different splits. The dressing by these components must be completed before the bulbing phase ends.
Water management in Onion crop
Water is essential for the growth of high-quality onions. Irrigation is needed at the time of sowing, transplanting followed by light irrigation on the third day of plantation and regular irrigation from seven to ten days while assessing the need for moist soil. The right amount of watering strengthens the roots and allows the organic compound to nourish the production.
Typically the onion plants require 30 inch irrigation close to the harvest and growing season. Less water can result in smaller bulbs of onion and less nutritious results. When the neck falling stage starts, irrigation must stop and let the soil dry completely and expect the production.
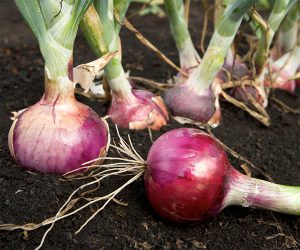
Harvest, Marketing and Storage of Onion
While harvesting the onion, its neck fall stage must be 50%. The harvesting is performed right after the maturity stage. The storage life of onion bulbs is about 5-6 months in a suitable storage place. The storage must be fully-equipped and developed to keep the onion fresh and ready to ship anytime needed.
Harvesting at the right time is necessary to avoid issues like thick-neck bulbs, respiration, and disease, extra sprouting, and sunburn due to leaving for a long time in the sun.
Heavy head onion crops are kept from two to three days in the field and 3-4 days to drain the extra moisture in the product. This leftover process decreases the shrinkage and lets the onion gain color and texture. The taste is also enhanced in this phase.The marketing of onions is the most straightforward task to do. It doesn’t need sales strategies; the quality, color, and fragrance speak for themselves.
FAQs
Q1. Which soil is perfect for onion farming?
Ans.Clay to sandy loam soil is perfect for onion cultivation. A proper drainage facility and measured pH of around 6.5-7.5 is the right texture for soil. Soil preparation before sowing the seeds makes the upcoming steps easy and smooth to function. The outcome also grows in the right direction.
Q2. What is the Nursery raising and onion seed rate per hectare?
Ans.The nursery raising process includes assessing soil bedding for sowing the seeds. Usually, the onion seeds are sprinkled on raised beds of 3.4 m in length and 1.2 m in width. It takes 45-50 days for the transplanting process after sowing the seeds in the soil. The onion seed rate per hectare is 7 to 9 kg/ha. The measurement of 1 ha is equal to 2.48 acres.
Q3. How to germinate the onion seeds indoors?
Ans. Months of March and February are best for growing onions indoors. Make sure to select slay soil with adequate moisture. Sprinkle the seeds all over the soil and mix smoothly. If there is a growing variety of onions, don’t forget to label them and care, water, and prevent waste.
Q4. Does the cultivation of onions require lots of water?
Ans. An adequate amount of water is required for growing high-yield onions. Over watering can build disease in plants and may cause rotting in the ground. Less watering can dry the soil, and less moisture can cause the underdevelopment of onions. Considering the rainfall and measuring the moisture in soil defines the need for water in the growth phase. It is recommended to water one-inch water 2 to 1 times a week.
Note: The information contained herein is for informational purposes only. Nothing herein shall be construed to be financial or legal advice. Pesticides are a considerable risk of loss in crops and viewers are advised to do their own research before making any decisions.
Is your turmeric farming not attaining a high yield? You must try turmeric farming in a polyhouse. Let’s walk with the guide to cultivating effective production of turmeric.
Table of contents
Introduction to turmeric farming in polyhouse
Soil and climate requirements for turmeric farming in Polyhouse
What are the needs for organic turmeric farming in Polyhouse?
What is the seed rate of turmeric cultivation in Polyhouse?
What are the essentials while preparing Polyhouse for turmeric farming?
Introduction to turmeric farming in polyhouse
Turmeric is a popular spice in Indian households; it’s a yellow color spice with multi-benefits. Turmeric, also called Haldi, boosts immunity in the body, helps to heal wounds, brings a natural glow to your face, and is used in Indian curry recipes.
Haldi is a flavoring and coloring agent loaded with antibiotics and nutrients. Curcumin is the plant pigment that provides turmeric with its vibrant color.
Does the vibrant color of Haldi energize you and trigger you to know more about its farming process. We will highlight the critical steps in organic turmeric farming in Polyhouse.
Let’s get into the article.
Soil and climate requirements for turmeric farming in Polyhouse
Black loam soil, rich loamy soil, and clayey soil or red soil are ideal soil drained properly for turmeric farming. Alkalinity or logging water destroys turmeric production in the polyhouse setup.
Turmeric requires warm plus humid weather and a temperature range of 20-30 degree celsius with 1500 mm or more rainfall. The early-planted turmeric with proper irrigation produces a high yield in polyhouse.
Methods of Turmeric farming in polyhouse
Turmeric farming
There are two specific methods of Turmeric farming in the polyhouse such as:
Furrows and Ridges
The furrow method in polyhouse is used in heavy soil on leveled land under irrigation conditions. The field will be partitioned into furrows and ridges at a distance of 75 cm each with a length of around 35 meters.
Flatbeds
Flatbeds are prepared 1 m in width and length depending on the slopes designed in the polyhouse. The beds are made under the condition of light soil.
In polyhouse organic turmeric can be sown in pots and containers. They are cheerful and also encourage other crop growth like onion and ginger.
Planting process of turmeric
While planting in a polyhouse, prepare the spacing of 20-25 cm between plants and prepare a mixture of soil and 25g powdered neem cake; mix it well in each row. Pick healthy rhizomes seeds, put them in low pits, and wrap them with properly mixed compost.
Incorporate 10g compost and Trichoderma, which acts as a biofertilizer and protects the growth of the crop throughout from pests and disease.
Irrigation requirement in Turmeric crops
Irrigation before and after sowing is essential for developing Rhizomes and overall crop growth. The turmeric crop period is 7-9 months which varies in different varieties.
Turmeric requires a weekly irrigation means at an interval of around 7-10 days. Over irrigation in turmeric plantation affects the quality of the rhizome and chances of getting fungal diseases will increase. Overall, 20-25 days of irrigation is prescribed for one crop session.
Harvesting of Turmeric Rhizomes
Turmeric farming
In about 7-9 months after plantation, rhizomes are ready for harvest and easily handpicked in the polyhouse. The fingers are separated from mother rhizomes and can be used in the next session of turmeric farming.
The turmeric yield per acre is around 8-10 tonnes, and it also fluctuates sometimes.
FAQs
Q1. What are the needs for organic turmeric farming in a polyhouse?
Ans. In polyhouse, organic farming is practiced with the same components such as; avoiding using chemical fertilizers and composting with regular soil rotation to keep soil and environment healthy. It requires organic compost, fertilizers made from plant and animal waste, and uniform irrigation.
Q2. What is the seed rate of turmeric cultivation in a polyhouse?
Ans. The seed rate of turmeric depends on the quality, color, planting material, and spacing. For example, Rhizomes, mother rhizomes cost 2000-2500 kg/ha, Finger rhizomes cost 1500-2000 kg/ha, and intercrop costs 400-500 kg/ha.
Q3. What are the essentials while preparing a polyhouse for turmeric farming?
Ans. There are five factors to be considered in site selection for the construction of polyhouse, accessibility to polyhouse, pollution, water logging, and facility of the semi-automated greenhouse.
Note: The information contained herein is for informational purposes only. Nothing herein shall be construed to be financial or legal advice. Pesticides are a considerable risk of loss in crops and viewers are advised to do their own research before making any decisions.
Do you want to explore the best tips and hacks for organic tomato cultivation? Learn with the guide from sowing to harvest to produce high-yield marketable tomatoes.
What are the seed treatment and rates in organic tomato farming?
What is the cost of organic tomatoes?
Name some organic tomato farming fertilizers.
What is the tomato’s yield per acre?
Introduction to Tomato farming
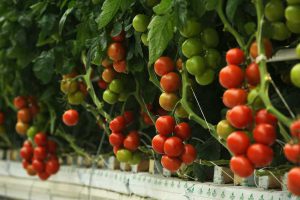
The red, sweet, and tangy taste reminds me of tomatoes. Does tomato farming fascinate you? Do you want to know how these juicy tomatoes are grown? The various varieties and organic techniques of growing tomatoes make it worth tasting.
The process of growing organic tomatoes includes several steps, which start from assessing the soil and climate, using the pesticides & fertilizers, applying the adequate irrigation, disease prevention, and timely harvesting. Let’s read about the process of tomato cultivation.
tomato farming
Area and production in India
It is amazing to note the quantum jump in the spread of tomato during the last four decades. In India, crops were grown in an area of 36000 ha. During 1960 and present, area and production in the country is 4.58 lakh ha. and 74.62 lakh tones respectively with a productivity of 16.29 t/ha. Leading Tomato producing states are UP, Karnataka, Maharashtra, Haryana, Punjab and Bihar.
Nutritive value of Tomato fruits
Tomato occupies a prime position in list of protective foods since it is a rich source of minerals like calcium (48 mg / 100g), sodium (12.9 mg), trace elements, copper (0.19 mg), vitamins like vitamin A (900 IU), vitamin C (27 mg), vitamin B complex (thiamine), essential amino acids and healthy organic acids like citric, formic and acetic acids
A brief Introduction to Tomato
Tomatoes belong to the genus Lycopersicon which originated from the Solanaceae family. It’s a sprawling herbaceous plant with a flexible fragile neck that grows 1-3 m in height. Tomatoes are known worldwide and are one of the most consumable Solanaceae vegetables.
In short, tomato cultivation generates high-yield with less storage period. The farming and rate of tomato cultivation are pretty economical for farmers and consumers both. The production from tomato farming is increasing as consumption is speeding up.
Let’s learn the best ways to grow tomatoes with the best cultivation practices and the best techniques to get the high produce.
Soil Bed Preparation For Tomato Planting
The sandy and loam soil is the ideal soil considered for growing tomatoes. The pH of the soil must be neutral. The tomatoes do not succeed in clay soil because the clay soils don’t allow the long roots to spread evenly inside the ground.
If the farmers have only clay soil, it can be amalgamated with sand, peat moss, or coco coir to inculcate moisture, texture, and drainage into the soil.
If the farmer is growing organic tomatoes in a pot or putting fresh seeds in a bed of field, they must use well decomposed, aged compost. The aged compost has extra nutrients, which incorporates the perfect balance of moisture, texture, and drainage in soil and helps to produce the best tomatoes.
Green manures, cover crops, rock minerals, and compost form the combination of organic soil. However, acidic soil with a pH of 6.2-6.8 encourages growth, and the warmth of sandy soil pushes the early harvesting of tomato farming.
Organic Farming of Tomato
Organic farming refers to the production of fruits and vegetables with natural components like compost, organic or plant-based pesticides, and bio-fertilizers. In organic tomato farming, a different set of the environment is designed, which includes preparing the farm, management, and strategy to achieve sustainable development without using harmful chemicals.
The ultimate goal of organic farming is to produce high-quality agricultural products with no chemicals. It keeps the environment healthy and clean, along with maintaining soil fertility.
However, organic tomato farming is a little expensive and takes time to adjust, settle and attain equilibrium. Here are the components of organic agriculture which help achieve the best outcome in vegetable and fruit production.
Rotation of crops
Rotation of crops is the best way to boost the healthy production of vegetables and fruits. It is suggested to rotate Solanaceae crops with non-Solanaceae crops like legumes and pulses to regulate the soil quality and avoid pests and diseases in the crops. It also builds the nutritional level of tomatoes.
Planting material
Selection of the planting material boosts the production and saves from further wastage. It includes high-yielding chemically untreated seeds, certified farms, aged compost, and organic compounds.
Fertility of soil
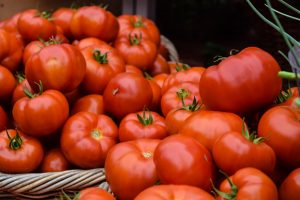
Over time, using chemical pesticides, soil loses fertility and needs refilling. Make sure to add organic components to the soil to boost and maintain soil nutrition. Also keep rotating the crops and maintain the nitrogen level of the soil.
Tomato farming
Irrigation required in Tomato cultivation
The plant size, climate, and soil texture decide the water requirement. Overhead sprinklers, surface & furrow flooding, and trickle or drip irrigation techniques are used in tomato farming. The flooding technique is used in large production, while the sprinkler technique is used for wetting the crops from foliage to soil. Tomato farming requires 1-1.3 inches of water once a week.
The irrigation for tomato farming requires the right amount of water at the right time. In winter, it needs irrigation every 10-15 days; in summers, irrigation can be given at an interval of 5-7 days.
FAQs
Q1. What are the seed treatment and rates in organic tomato farming?
Ans. The organic tomato seeds rate comes expensive and needs to be sown in an ice cube tray or plastic cups which need 70-90 gm /acre. On the other hand, the nursery needs 200-250 g of seeds to plant in a hectare. Treat 5-10 gm Trichoderma with 1 kg seeds or 2 gm of Carbendazim 50 gm wettable powder with 1 kg of seeds to prevent seed borne diseases. Seeds are dried for 30 minutes after treatment, sown into the lines of ½ cm depth, and the seeds are wrapped with a top layer of soil.
Q2. What is the spacing for growing organic tomatoes?
Ans. In organic tomato farming, the spacing for spring-summer crops is 75 x 45 cm and for autumn-winter crops is 75 x 60 cm.
Q3. Name some organic tomato farming fertilizers.
Ans. Compost, Organic Cottonseed meal, biofertilizers like Rhizobium, Azospirillum, VAM, Neem cake, and Fish emulsion are some organic options of fertilizers for tomato cultivation to attain the best production of fresh, taste-packed, juicy, tangy, and nutritious tomatoes.
Q4. What is the tomato’s yield per acre?
Ans. Tomatoes are harvested after three months from the day of transplantation, and around 8- 10 harvesting can be taken in tomato farming. According to some reports, the average yield per acre of tomato farming is around 10 tonnes, and it may vary up to 15-20 tonnes per acre on the basis of different conditions like season, irrigation, plant protection and climatic conditions.
Note: The information contained herein is for informational purposes only. Nothing herein shall be construed to be financial or legal advice. Pesticides are a considerable risk of loss in crops and viewers are advised to do their own research before making any decisions.
Do you want to kick off the insect pests from the paddy crop? But don’t know how to prevent pests? Follow the guide to catch early damage symptoms and control measures to protect the effective yield of paddy crops.
Name two measures of Armyworm in rice cultivation?
Introduction to significant pests in paddy crop
Rice counts primarily in the list of staple foods and is also known as paddy. It is damaged very quickly by some insect pests. Farmers incur losses due to crop degradation, and it causes a hole in the pocket of rice farmers.
Here we’ll read about the preventive measures to save paddy crops using physical, mechanical, biological, and chemical prevention methods.
Some of the significant insects and pests in paddy crop which causes heavy damage:-
Plant hoppers, Stem borer, Rice Hispa beetle, Gall midge, Paddy leaf roller, Whiteflies, Rice bugs, Leaf miners, Aphids, Thrips, swarming caterpillars, and several more.
Let’s discuss a couple of them in detail.
Plant hoppers
There are two types of planthoppers that affect the paddy crop namely, Brown Plant Hopper (BPH) and White Backed Plant Hopper. Scientific names for these two are Nilaparvata lugens and Sogatella furcifera.
Paddy crop
Let’s read about the symptoms of these:-
Brown and white color nymphs are visible on the leaves.
Crescent-shaped eggs can be visible in the midrib of the leaves.
Leaves are turning into yellow and orange shades.
Here are the preventive measures:
Less usage of nitrogen fertilizers and removal of weeds.
Avoid the use of chemical insecticides.
Physical or mechanical control
Protect the seedlings from direct exposure to insects by supplying enough water once a day such that only the tips of the seedlings are exposed.
To sweep the BPH, run a net over the seedling smoothly.
Biological and chemical prevention
Release of spiders, mirid bugs, water striders, parasitoids, etc.; after that, avoid spraying the insecticides in the crop.
When the crop reaches the seedling stage, spray insecticides, and you can mix it with other combinations and then apply it.
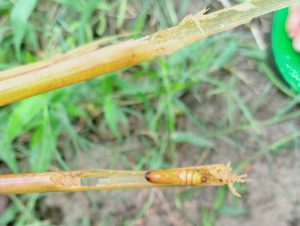
Paddy stem borer
There are several varieties of paddy stem borer that destroy paddy crops. Yellow stem borer, Dark headed striped, white stem borer, and several more.
Paddy pests
Let’s read about the damage of these:
The appearance of tiny caterpillars on the leaves.
They attack between seedlings to maturity.
Showing dead heart damage symptoms like rats, neck blasts, and black bugs.
Here are the preventive measures:
Adapt the cultivation of varieties.
Apply the nitrogenous fertilizers in uniform intervals along with trimming tips after transplanting.
Biological and chemical prevention
Use neem extract @15 ml/liter of irrigation water and kill stem borer moth to protect the paddy crop.
Before transplanting, dip the roots of the paddy crop into Chlorpyriphos for a minute or two.
FAQs
Q1. What are the symptoms of paddy leaf roller?
– Here are the symptoms of paddy leaf roller-
Visible transparent white streaks on the paddy crop leaf.
Tubular fold leaves are the earliest symptom.
Disc-shaped eggs are visible on the leaves of the paddy crop.
Q2. What is Rice Hispa?
-The rice hispa is an insect that damages the paddy crop in the grub and adult stages. It degrades the leaves by scraping the leaves. The size of an adult beetle measures 3-5 mm in length and width.
Q3. Mention the measures to control Armyworms in rice cultivation.
– Roguing and ploughing at regular intervals to prevent the production of worms.
– Control grassy weeds in the rice field.
– Rotate rice with vegetable crops.
Note: The information contained herein is for informational purposes only. Nothing herein shall be construed to be financial or legal advice. Pesticides are a considerable risk of loss in crops and viewers are advised to do their own research before making any decisions.