Are you tired of struggling with chilli cultivation and not getting the results you want? If so, you’re in the right place!
Our article on chilli cultivation practices is just what you need to take your crop to the next level! From choosing the right variety of chilli to preparing the soil, providing adequate water, controlling pests and diseases, and harvesting your chillies at the right time, this article covers it all! By following our step-by-step guide, you’ll be able to grow chillies that not only taste great but also contain essential vitamins and minerals. Imagine having a bountiful harvest of healthy, vibrant chillies that you can use in your cooking or sell at the market. So, if you’re ready to increase your farm yield with quality produce, make sure to read and follow these cultivation practices. You won’t be disappointed!
Climate and Soil requirement
For optimal growth, chilli plants thrive in both warm and humid climate, while dry weather conditions enhance fruit maturation. The ideal temperature range for its cultivation is between 20-25°C. Heavy rainfall can lead to poor fruit set, and when coupled with high humidity, it can cause the fruit to rot. Chilli plants cannot tolerate frost. An ideal soil type for chilli cultivation is a well-drained, loamy soil, rich in organic matter, and has a pH range of 6.5-7.5.
Spice up your harvest with these BigHaat’s top-selling chilli seeds in every state!
| States |
Most sold chilli seeds |
| Andhra Pradesh |
Armour F1 Hybrid, Yashaswini Chilli, HPH 5531 Chilli, Mahyco Capexx Chilli, US 341 Chilli, SARPAN – 102 Byadgi Chilli Seeds, Bangaram F1 Hybrid Chilli |
| Telangana |
US 341 Chilli, Yashaswini Chilli, Armour F1 Hybrid, Tejaswini Chilli, SVHA 2222 Chilli, HPH 5531 Chilli, Sitara Chilli |
| Maharashtra |
SARPAN – 102 Byadgi Chilli Seeds, US 1081 Chilli, Royal Bullet Chilli, HPH 5531 Chilli, Armour F1 Hybrid, US 341 Chilli, Sitara Gold Chilli |
| Tamil Nadu |
Bangaram F1 Hybrid Chilli, Royal Bullet Chilli, VNR 145 Chilli, Yashaswini Chilli, NS 1101 Chilli, Tejaswini Chilli, Indam 5 Chilli |
| Madhya Pradesh |
Armour F1 Hybrid, Navtej MHCP 319 Chilli, NS 1701 DG Chilli, NS 1101 Chilli, Rudra 101 F1 Chilli, US 730 Chilli, Sarpan F1-Sona 63 Chilli |
| Karnataka |
HPH 5531 Chilli, SARPAN – 102 Byadgi Chilli Seeds, HPH 2043 Chilli, Ulka F1 Chilli, Yashaswini Chilli, Armour F1 Hybrid |
| Odisha |
Royal Bullet Chilli, Armour F1 Hybrid, VNR 145 Chilli, NS 1701 DG Chilli, US 730 Chilli, Navtej MHCP 319 Chilli, Sarpan Hybrid Mahakali Chilli |
Don’t just plant any chilli seeds, choose the best from BigHaat!
It is important to choose the right variety/hybrid of chilli based on your soil type, climate, and location. Select the variety that can adapt well to your local weather conditions.
| Top 8 Chilli Seeds |
Features |
| Armour Chilli F1 Hybrid Seeds |
- Suitable for both fresh (green) and dry (red) purposes.
- High fruit pungency.
- Early maturing and high yielding.
|
| Royal Bullet Chilli Seeds |
- It matures 10 – 12 days earlier than local variety.
- Fruit length is 4 – 5 cm.
- Used for fresh green fruits.
- Highly Pungent.
|
| HPH 5531 Chilli Seeds |
- Dense bearing with medium green fruits.
- Can be used for both green and red fruits.
- Medium pungency and early maturing.
- Yield – 12 to 15 MT/acre in green fresh and 1.5 to 2 MT in Red dry (May depend upon season and cultural practices).
|
| NS 1101 Chilli Seeds |
- Matures in 70 – 75 days.
- Can be used for both green (fresh) and red (dry).
- Very high pungency.
- Fruit length is 8 – 10 cm with medium thick pericarp.
|
| Sarpan 102 Byadgi Chilli |
- Average Plant height is 90-100 cm.
- Fruit length is 15-18 cm.
- Suitable for irrigated and dry land farming.
- Suitable for dry chilli.
- Cherry red colour, highly wrinkled with acidic flavour.
|
| VNR 145 Green Chilli |
- Early hybrid with short picking interval.
- Highly pungent; Suitable for green chilli.
- Parrot green colour fruits with smooth and shiny fruits.
- First Harvest – 50 to 55 days.
- Fruit length – 12 to 16 cm.
|
| Rudraksh 101 F1 Chilli Seeds |
- Very highly pungent; Best for green chilli.
- Maturity – 65-70 Days; Length: 12-14 cm.
- Tolerant to fusarium & virus.
- Good for fresh market.
|
| Sarpan Chilli Bajji Seeds
|
- Attractive light green color, thick wall fruits, 12 – 15 cm long and have medium pungency.
- Suitable for fresh (green fruits) purpose (Bhajji / Pakoda).
- Fruits have very good shelf life.
|
To find more chilli seeds click here
Time of sowing
Chilli can be sown during Jan – Feb, Jun – Jul and Sept – Oct.
Seed rate for optimum yield
Varieties – 400 gm/acre; Hybrids – 80 – 100 g/acre.
Seed treatment
Treat 1 kg of chilli seeds with 6 ml of Trichoderma viride or 10 grams of Pseudomonas fluorescens before sowing to prevent damping off, collar rot, root rot and other seed borne diseases.
Nursery Management
If you want to increase your chances of a successful chilli crop, it’s important to know that chilli seedlings are typically grown in a nursery first and can be grown in either nursery beds or protrays before being transplanted to the main field. This can help ensure healthy growth and a higher yield.
For raising seedlings for 1 acre field, you will need 40 m2 / 1 cent of nursery area.
| Nursery Raised Bed |
Protrays |
- Incorporate well decomposed FYM to pulverized soil.
- Prepare raised seedbeds of 1 m width, 15 cm height and of convenient length.
- Sow the treated seeds in lines spaced 5 cm apart and cover them with sand or well decomposed compost.
- Mulch the bed with paddy straw or green leaves after sowing.
- Water the bed every morning with rose can.
- Remove the mulch once the seeds have started germinating.
- Drench the nursery bed with copper oxychloride at 2 gm/lit water with 15 days interval to avoid damping off.
|
- Fill the protrays (98 cells) with sterilized coco peat. (Approx. 1.2 kg of cocopeat is required per protray)
- For 1 acre field, 120 protrays of 98 cells will be required to get 11,700 seedlings.
- Sow 1 treated seed per cell and cover it with coco peat.
- You can notice germination in about 6 – 8 days.
- Water the seedlings daily using rose can.
- Drench with 5 gm/lit of 19:19:19, 18 days after sowing.
(Note: Protrays can be maintained inside a green house or shade net house) |
Main Field Preparation
Plough the soil 2 –3 times to get a fine tilth. Incorporate 10t of FYM to the soil during last ploughing. Apply 1 liter of Azospirillium and Phosphobacteria by mixing with 50 kg of well decomposed manure or cake. Prepare ridges and furrows at 60 cm spacing.
Transplanting
Your seedlings will be ready for transplanting after 30 – 40 days. Irrigate the furrows and then transplant 40 – 45 days old seedlings on the ridges. Plant seedlings of varieties spaced 60 cm between rows and 45 cm between plants, while hybrids spaced 75 cm between rows and 60 cm between plants.
Intercultural Operations
Nutrient Management
Maximizing your chilli crop yield is all about proper fertilizer management. Choose the right type of fertilizer and apply it at the right time and in the right amount. The general dose of NPK recommendation for chilli crop is 48:24:16 kg/acre. Due to its lengthy growing season, it is important to apply manure and fertilizers carefully in split doses to ensure supply of nutrients at all growth stages.
| Nutrient |
Fertilizer |
Dosage per acre |
Time of application |
| Organic |
FYM |
10 t/acre |
At the time of last ploughing |
| Biofertilizer |
Azospirillium |
1 lit of product + 50 kg of FYM |
At the time of ploughing |
| Phosphobacteria |
1 lit of product + 50 kg of FYM |
| N |
Urea |
26 kg |
Basal |
| 26 kg |
30 DAT |
| 26 kg |
60 DAT |
| 26 kg |
90DAT |
| P |
Single Super Phosphate (SSP) |
150 kg |
Basal |
| K |
Potassium sulphate (SOP) |
13 kg |
Basal (SOP will improve chilli quality) |
| 13 kg |
20 – 30 DAT |
| B |
Anshul Maxbor |
1 gm/lit water |
1st spray – Before flowering
2nd spray – After 10 to 12 days interval |
| Zn |
Zinc micronutrient fertilizer |
Foliar: 0.5 – 0.6 gm/lit water |
3 sprays with 10 days interval from 40 DAT |
| NPK + Mn |
19:19:19 + Mn |
Foliar: 1 gm/lit water |
60 DAT |
(*DAT – Days after transplanting)
Water Management
Irrigate the field immediately after transplanting. You can subsequently irrigate once a week or 10 days depending upon the soil moisture condition and weather. Chilli plants are least tolerant to heavy moisture so, ensure that you water the plants only when required. The flowering and fruit development stages are considered critical periods for the plant’s water requirements.
If you see plants showing wilting / drooping of leaves at mid-day, irrigate the field. Chilli is normally cultivated under rainfed conditions, however irrigated chilli crops are also grown. If you are growing chilli under irrigated condition, adopt furrow or drip irrigation. Overhead irrigation can be avoided as it will promote disease development due to wetting of leaves.
Earthing up and Mulching
Perform earthing up, 30 days after transplanting. Then, use paddy straw or dried leaves for mulching. Mulches will help to conserve moisture and also reduce weed growth.
Weed Management
Spray Pendimethalin (600 – 700 ml/acre) as pre-emergence herbicide. Give two hand weeding, first within 20 – 25 DAT, after herbicide application while next after 20 – 25 days of 1st weeding to keep the field free from weeds.
(Note: Follow product’s description or label for herbicide application)
Intercropping
If you’re additionally looking for ways to increase yield and profitability from your chilli field, ‘intercrops’ are the best solution. Intercrop chilli with coriander (1:3), onion (paired rows), or groundnut (3:1) to get higher net returns. It also helps to improve soil fertility and reduce pressure of pests and diseases.
Use of Plant Growth Regulators (PGR)
| PGR product |
Technical content |
Dosage |
Time of application |
| Miracle Growth Regulator
(Enhances vegetative growth, flower and fruit setting) |
Triacontanol EW 0.1 % |
1 – 1.25 ml/lit water |
25 DAT, 45DAT, 65 DAT* |
| Planofix Alpha Growth Promoter
(Prevents shedding of flower buds, increase fruit set and quality) |
Alpha Naphthyl Acetic Acid 4.5% SL |
0.2 – 0.3 ml/lit water |
1st spray: During flowering stage
2nd spray: 20 – 30 days after 1st spray |
(*DAT – Days after transplanting)
Plant Protection Practices
Pests of Chilli crop
Keep your chilli plants pest-free with proper pest management.
| Pest |
Symptoms |
Control Measures |
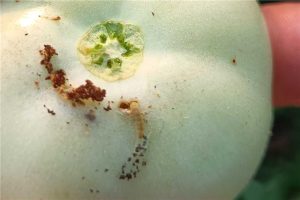
| Fruit borer |
- Larvae consume the internal content of the chilli fruit by making small holes and inserting their head inside while keeping the rest of their body outside.
|
|
| Tobacco caterpillar |
- The caterpillars feed on the leaves, creating irregularly shaped holes in the foliage.
- After feeding, they leave behind only the veins and give the leaf a “skeletonized” appearance.
|
|
| Thrips |
- They suck the sap from the leaf juices and causes crinkling and curling up of leaves.
- They lacerate the leaf surface and cause “Silvery or bronze appearance”.
- Affected flower buds become brittle and later drop down.
|
|
| Aphids |
- Affected leaves may turn yellow or pale.
- They can become distorted or curled.
- Presence of black sooty mould due to honeydew secreted by them.
|
|
| Yellow muranai mite |
- Downward curling and crinkling appearance of chilli leaves.
- Petiole of the infested leaves become elongated.
- Premature leaf drop.
|
|
| Root knot nematode |
- Infected plants may show signs of yellowing of the leaves or chlorosis and wilting.
- Presence of small galls on the roots.
|
|
Are thrips and mites causing trouble in your chilli field? Click here to learn more on how to get rid of them for good!
Diseases affecting chilli plants
Are your chilli plants showing signs of yellowing, wilting or stunted growth? These could be symptoms of a disease affecting your crops. Don’t panic, you can still save your harvest! Know the signs of disease early and take action to protect your crop and prevent further damage. Don’t wait until it’s too late.
| Disease |
Symptoms |
Control Measures |
| Damping off |
- Seedlings may die before or soon after emerging from the soil.
- Affected seedlings may wilt and collapse at the soil line. They may appear water-soaked or slimy.
|
|
| Anthracnose or Fruit rot |
- Small, water-soaked lesions appear on the leaves, stems, or fruits of chilli plants.
- Branches show necrotic symptoms from tip downwards (dieback).
- Causes the fruit to rot and become discolored, with dark, sunken spots.
|
|
| Powdery mildew |
- Presence of white or grayish powdery spots on the lower side of the leaves.
- Upper leaf surface may show yellow patches.
- Drying and shedding of leaves.
|
|
| Bacterial leaf spot |
- The spots are usually small and angular with a yellow halo.
- In severe cases, leaves turn yellow and fall off.
|
|
| Cercospora leaf spot |
- The spots are larger and round/oval with a tan to brown center and dark border.
|
|
| Fusarium wilt |
- Yellowing and wilting of leaves.
- Leaves roll upwards and inward.
- Brown discoloration in the stem, and the internal tissues.
|
|
| Viral Diseases
(Leaf curl, mosaic) |
- Yellowing and curling of leaves.
- Presence of light and dark green mosaic patterns on the leaves
- Fruits may become misshapen or smaller in size.
|
Control vectors (whitefly/Thrips/Aphids):
|
Protect your chilli plants from viral infections – click here to know how!
NOTE: Follow product’s label or description to know the right time of application.
Harvesting
The appropriate time to harvest chillies varies depending on the type and intended use of the crop. Chilli plants typically start flowering around two months after transplanting, and it takes about another month for the fruits to reach the green stage. If the chillies are intended for vegetable consumption, you can harvest them when they are still green. On the other hand, if the chillies are meant for drying, they can be left to fully ripen before harvesting.
You can harvest the first yield when the fruits are green around 75 DAT. Subsequently, ripened red fruits can be harvested at 1–2 week intervals. The yield of green chillies will be 3 – 4 times higher than dry chillies.
Yield
- Varieties: 4 – 6 t/acre (green chillies); 0.8 – 1 t/ha (dry pods)
- Hybrid: 10 t/ha (green chillies)
Drying
It is important to keep in mind that you preserve the red colour of the chilli fruits during the drying process. You can dry the chillies under the sun for a week or more, depending on the weather conditions. Turn the chillies regularly to ensure even drying and to prevent mold growth. Alternatively, you can also use a solar dryer or oven (8 hr at 60°C, then reducing it to 50°C) for drying if available.